
DIY Shaving Horse for Logs: Build a Heavy-Duty Drawknife Workbench
There are some jobs where a power tool is technically faster, yet the old hand-tool solution somehow makes more sense. Peeling bark from a straight log is one of them. A sharp drawknife will remove bark surprisingly quickly, but only if the log stays exactly where you put it instead of rolling, sliding or forcing you to wrestle with it after every few strokes.
That is the problem that led me to a shaving horse. I have several very straight trees roughly 7 to 10 inches in diameter and close to 10 feet long, and I want to strip the bark from the final couple of feet. Trying to hold a log that size while pulling a drawknife toward yourself is awkward at best, so rather than inventing increasingly questionable ways to clamp the trees down, I decided it made more sense to build the tool woodworkers have been using for generations.
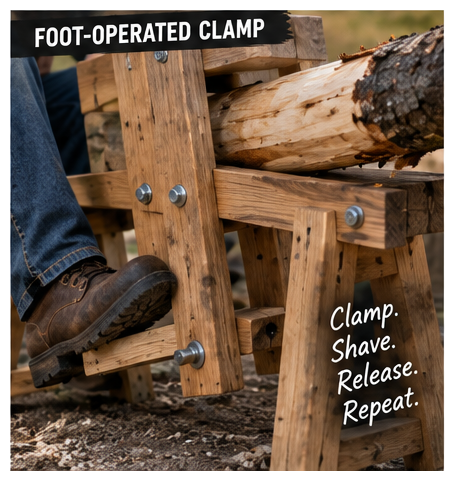
A shaving horse is basically a bench you sit on combined with a foot-operated wooden vise. Your feet provide the clamping pressure while both hands remain free to control the drawknife. Release your feet and the workpiece is instantly free to rotate or reposition; press again and it locks back into place.
For small chair parts, traditional shaving horses can be relatively light and compact. This build is intentionally different. It is designed around large round poles and logs, which means a heavier base, a wider clamping jaw, a V-shaped cradle and a second support for the far end of long timber.
Project at a Glance
This is a straightforward woodworking project, but I would put it slightly above absolute beginner level because the clamping mechanism needs to move smoothly and the finished horse needs to be stable.
- Difficulty: Beginner to intermediate
- Build time: Approximately 4–6 hours
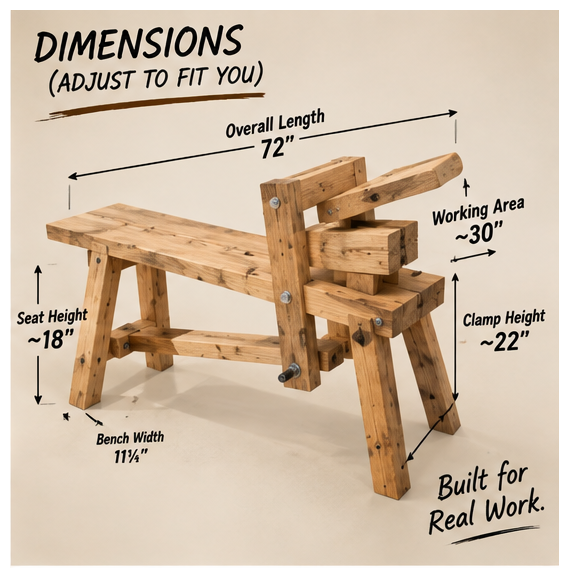
- Overall length: About 72 inches
- Bench height: Approximately 18 inches
- Bench width: About 11¼ inches
- Target workpiece size: Up to roughly 10 inches in diameter
- Primary use: Debarking and shaping logs with a drawknife
- Estimated lumber cost: Roughly $50–$100 if buying everything new, potentially much less using scrap lumber
- Main tools: Circular or miter saw, drill/driver, jigsaw and basic hand tools
The dimensions are intentionally adjustable. Shaving horses are personal tools, and a few inches of difference in seat height, pedal location or clamping geometry can dramatically affect how comfortable one feels.
What Exactly Is a Shaving Horse?
A shaving horse is one of those tools that looks more complicated than it actually is. At its core, it is simply a foot-operated clamp attached to a low workbench. A pivoting lever carries a clamping bar above the workpiece and a treadle below the bench.
Push the lower portion away with your feet and the lever rotates, forcing the upper jaw against the wood. The harder you pull on the drawknife, the more naturally you brace with your feet and the stronger the clamp becomes. Fine Woodworking describes essentially the same principle: the shaving horse allows the user’s foot pressure and pulling motion to reinforce the grip on the workpiece.
That simple feedback loop is what makes the design so effective. There is no vise screw to loosen every time you want to rotate a log and no hand clamp blocking the path of the drawknife. You simply relax your feet, turn the wood and clamp it again.
Shaving horses have traditionally been associated with chair legs, rungs, paddles, walking sticks and other green-woodworking projects. Lee Valley’s traditional English shaving-horse plan also describes the tool as useful for a variety of seated chairmaking and shaping operations.
For my purposes, however, I am scaling the idea toward something heavier.
Why This Version Is Designed Differently
If your largest workpiece is a chair spindle, you do not need a shaving horse built like a tank. A 7-to-10-inch-diameter green log is another matter.
The most obvious issue is weight. Even if the shaving horse only supports one end of a 10-foot pole, the wood can create substantial leverage against the bench. The second issue is shape: round logs naturally want to roll, while traditional shaving-horse workpieces are often split billets or relatively narrow pieces.
For those reasons, this design uses three features that I consider important.
First, the main bench is a solid 2×12 rather than a collection of lightweight pallet boards. I like reclaimed lumber, but this is one place where predictable structural lumber is worth having.
Second, two V-shaped cradle blocks support the log. The V does not need to fit the log perfectly; it simply gives a round workpiece two stable contact points instead of balancing it on a flat surface.
Third, the far end of any long pole gets its own support. The shaving horse is the clamp, not a cantilever test.
Materials
You can substitute lumber sizes depending on what you already have. I have plenty of scrap and pallet wood available, so I would use reclaimed material for braces, the treadle, jaw pads and smaller components while keeping the main structure heavier.
For the basic build, I would gather:
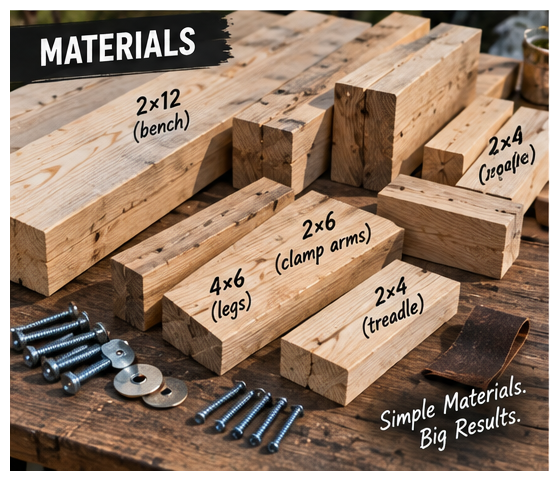
- One 2×12 approximately 72 inches long for the main bench
- Four 4×4 pieces for the legs
- Two 2×6 boards for the pivoting clamp arms
- One 2×6 for the upper clamping jaw
- One 2×4 for the foot treadle
- Scrap 2×8 or 2×10 lumber for the V-blocks
- Scrap lumber for diagonal braces and spacers
- One ½-inch structural or carriage bolt for the main pivot
- Large washers and a locknut
- Structural wood screws
- Optional smaller carriage bolts for removable legs
- Optional leather or rubber for the clamping surfaces
- Exterior finish if the horse will regularly be stored outdoors
I would avoid drywall screws for the structural parts. They are convenient for hanging drywall, not for building a bench that is repeatedly loaded, rocked and kicked while supporting substantial pieces of timber.
Suggested Cut List
Pallet lumber, scrap lumber and even dimensional framing lumber can vary, so measure the pieces you actually have before making repetitive cuts.
| Part | Quantity | Approximate Size |
|---|---|---|
| Main bench | 1 | 2×12 × 72″ |
| Legs | 4 | 4×4 × 20–24″ |
| Pivot arms | 2 | 2×6 × 36″ |
| Upper jaw | 1 | 2×6 × 18″ |
| Foot treadle | 1 | 2×4 × 20″ |
| V-shaped log cradles | 2 | 2×8 or 2×10 × 11¼” |
| Leg braces | 4 | Cut to fit |
| Optional seat | 1 | Approximately 18″ wide |
Do not treat the leg length as sacred. The finished seat should put you in a position where your feet comfortably reach the treadle without forcing you to stretch or hunch forward.
Research on traditional designs reaches the same basic conclusion: shaving-horse dimensions should fit the worker, with the seat, treadle and working height adjusted around the person using it.
Step 1: Start With the Main Bench
The simplest backbone for this shaving horse is a 6-foot length of 2×12.
Inspect the board and put the straighter edge upward. If there is a noticeable crown or bow, orient it so the finished bench does not rock unnecessarily.
The rear 20–24 inches becomes the seating area, while the remaining length provides the working platform and room for the clamping mechanism. Round over or sand the edges where your legs will contact the board because an unfinished 2×12 becomes considerably less charming after sitting on it for an hour.
Do not permanently install every component yet. One advantage of building a shaving horse yourself is being able to adjust it after you actually sit on it.
Step 2: Build a Base That Does Not Move
A shaving horse should feel planted.
You are going to sit on it, push forward with your feet and pull backward with both hands. Those opposing forces are exactly what make the clamp work, but they will also expose every weak joint in the base.
I would use four 4×4 legs approximately 20–24 inches long and install them with a slight outward angle. Aim for a finished floor footprint around 22–26 inches wide, considerably wider than the bench itself.
After temporarily fastening the legs, sit on the horse and move around aggressively. If you can make the base rack sideways with your body weight, add diagonal braces.
A workbench moving underneath you is annoying. A shaving horse moving while you have a sharp drawknife in your hands is something I would fix before taking the first shaving.
Step 3: Make the V-Shaped Log Cradles
This is the part that turns a normal shaving horse into something much better suited to round timber.
Take two pieces of 2×8 or 2×10 cut approximately the width of the main bench. Find the centre of each piece and mark a wide V on the upper edge.
A roughly 90-degree opening is a good starting point.
Cut the V using a jigsaw, circular saw followed by a handsaw, or whatever method you are comfortable controlling. Smooth the cut edges enough that they do not dig into the wood unnecessarily.
Position the two cradles roughly 16–20 inches apart near the working end of the bench.
Before fastening them permanently, put one of the actual logs you intend to use on the horse.
This is better than relying entirely on theoretical dimensions. Your 7-inch and 10-inch poles should both settle comfortably into the cradle without feeling as though they could easily roll sideways.
Once you’re satisfied, fasten the blocks securely.
Step 4: Build the Foot-Operated Clamp
The clamping mechanism consists of two heavy wooden lever arms—one running down each side of the bench.
Start with two pieces of 2×6 roughly 36 inches long.
Position them on opposite sides of the horse and temporarily clamp them in place. Drill a ½-inch pivot hole through both arms and the supporting structure between them.
Run the pivot bolt through the assembly with large washers.
Tighten the locknut enough to eliminate excessive sideways movement but not enough to prevent the arms from pivoting freely.
At the upper end, connect the two arms with an approximately 18-inch-wide 2×6 crosspiece. This becomes the upper clamping jaw.
At the lower end, install the 2×4 foot treadle.
Now you have the basic mechanism: push with your feet and the upper crossbar rotates toward the workpiece.
Build Adjustment Into the Clamp
This is one area where I would not blindly copy the simplest historical design.
I want this shaving horse to work with logs that may vary dramatically in diameter. A fixed pivot that clamps a 3-inch branch perfectly may have terrible leverage on a 10-inch pole.
The solution costs essentially nothing: drill several possible pivot locations.
Three holes spaced roughly 1½–2 inches apart give you different leverage and jaw positions. Moving the pivot bolt from one set of holes to another allows the horse to accommodate substantially different stock.
You are basically giving yourself a crude gearbox made from three holes and one bolt.
It is not glamorous, but it could make the difference between a shaving horse you occasionally use and one that becomes genuinely useful.
Step 5: Pad the Upper Jaw
A bare square edge pressing against a round log can concentrate a lot of pressure in one spot.
Round over the lower corners of the jaw and consider adding a replaceable gripping surface. A strip of thick leather works extremely well because it adds friction without aggressively marking the wood.
Rubber is another possibility.
For bark removal, damaging the bark obviously is not a major concern, but you may eventually use the horse for finished handles, chair parts or other pieces where clamp marks matter.
The pad is inexpensive insurance.
Step 6: Test the Horse Before Making It Pretty
This may be the most important step.
Do not paint it.
Do not apply three coats of finish.
Do not spend an hour making every screw line perfectly symmetrical.
Put a log in it.
Sit down, place your feet on the treadle and clamp the wood. Pull gently with the drawknife and pay attention to what the horse is telling you.
If the log slips, you may need more leverage or less clearance between the jaw and workpiece. Fine Woodworking notes that minimizing unnecessary jaw travel helps a shaving horse develop a stronger grip.
If your knees feel awkward, change the seat height.
If the treadle feels too far away, move it.
If the work sits too high, lower the cradle.
The shaving horse should be adjusted around the person using it, not the other way around.
Supporting a 10-Foot Log
This deserves its own section because it is easy to underestimate the leverage created by a long piece of green timber.
I would not put two feet of a 10-foot log in the shaving horse and allow the remaining eight feet to hang unsupported.
Instead, place a sturdy sawhorse, log cradle or roller stand beneath the far portion of the pole.
The setup should look conceptually like this:
Shaving horse → section being worked → long pole → secondary support
Adjust the second support until the timber sits naturally rather than trying to lever itself out of the shaving horse.
The purpose of the shaving horse is to clamp your working area. The second support carries much of the log’s weight.
When you want to work farther along the timber, reposition the supports.
This makes the job safer, puts less stress on the horse and saves you from fighting the weight of the tree with every drawknife stroke.
How I Plan to Debark the Logs
Once the horse is adjusted correctly, the actual workflow should be straightforward.
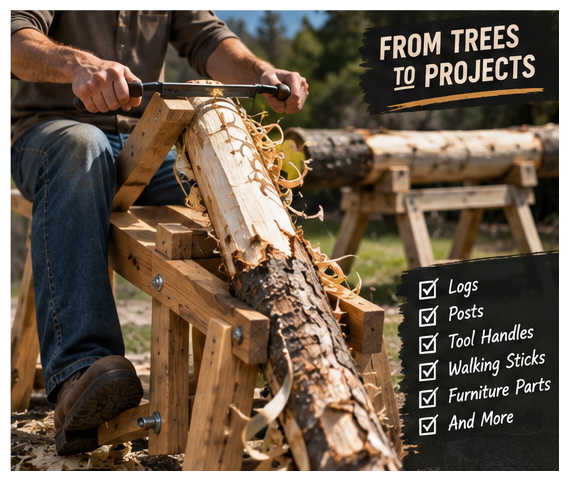
Place the final section of the log in the V-blocks and let the second support carry the opposite end. Sit on the horse and apply pressure to the treadle until the timber feels completely secure.
Grip the drawknife with both hands and begin making controlled cuts.
Rather than trying to rip enormous pieces of bark off in a single stroke, work progressively and let the blade follow the surface underneath. Fresh green wood can often be easier to shave and shape than fully seasoned material because it has not yet hardened through drying.
Once the exposed section is clean, release your feet.
Rotate the log.
Clamp it again.
Continue around the circumference.
That rapid clamp-release-rotate cycle is the entire reason this centuries-old tool remains so practical.
Drawknife Safety Matters
The shaving horse makes drawknife work much easier, but it does not make a drawknife harmless.
You are still holding a large sharpened blade in both hands and intentionally pulling it toward your body.
Keep both hands on the handles and keep your fingers away from the cutting edge. Position your legs so a sudden breakthrough does not send the blade directly into them.
Avoid leaning backward and yanking on stubborn grain.
If the blade refuses to cut, inspect the wood and change the angle instead of simply applying more force.
Knots, branch collars and reversing grain can grab a drawknife unexpectedly.
And before every series of cuts, make sure the workpiece is actually clamped.
The fastest way to make drawknife work unpleasant is to have the log move halfway through a stroke.
Is a Shaving Horse Really Worth Building?
This is the reasonable skeptical question.
If you need to remove bark from one log once in your life, probably not. There are plenty of ways to improvise workholding, and powered debarking tools can process large amounts of timber much faster.
But that is not the situation that interests me.
I already have multiple straight poles available, and I can think of several things I would like to make from them. Once the shaving horse exists, it becomes useful for far more than the original bark-removal job.
It can hold:
- Tool handles
- Walking sticks
- Chair components
- Rustic furniture parts
- Stakes and pegs
- Paddle blanks
- Small poles
- Bushcraft projects
- Fence components
- Green woodworking blanks
A shaving horse is particularly good at work that needs to be constantly repositioned.
That is something a normal bench vise does poorly.
Release your feet, turn the piece slightly and immediately clamp it again. Once the rhythm becomes natural, the tool almost disappears from the process.
Where This Design Has Limits
I would not pretend this is a universal log-processing machine.
A shaving horse is ideal when you want controlled hand-tool access to part of a workpiece. It is not the tool I would choose if I had 100 logs to debark commercially.
Very large or extremely heavy timber will eventually exceed what a person-sized bench can reasonably manage.
Short, awkward carving blanks can also be less convenient on a traditional shaving horse because the clamping head can interfere with access. Specialized devices such as spoon mules exist partly because different workholding problems benefit from different designs.
That does not make the shaving horse obsolete.
It simply means it has a job.
For straight poles, handles and long green-wood components that you want to shave manually, it is exceptionally good at that job.
Using Scrap Wood Without Making the Horse Flimsy
I am a big believer in using lumber that is already sitting around whenever possible.
But scrap wood should save money, not determine the engineering.
For this project, I would happily use pallet boards for braces, treadle parts, spacers, jaw pads and miscellaneous components.
I would be more selective with the main bench, legs and clamp arms.
Those pieces are structural.
If I have strong reclaimed lumber of sufficient size, great. If not, buying a few 2×6s, one 2×12 and some 4×4 material is still inexpensive compared with building a tool that flexes every time I use it.
The finished horse can look rough.
It should not feel weak.
What I Would Change After Building the First Version
This is one project where I expect version one to teach me something.
The nice thing is that nearly every important adjustment can be made without rebuilding the entire horse.
If the clamp does not accommodate smaller material well enough, I can add another pivot hole.
If the V-cradle is too deep, I can trim it.
If I want more grip, I can change the jaw pad.
If the seat becomes uncomfortable after an hour, I can add a wider seat board.
If I find myself processing more logs, I could even build a dedicated adjustable roller support for long timber.
I would rather start with a simple, strong mechanism and improve it after actually using it than spend days trying to predict every possible problem on paper.
Why a Centuries-Old Tool Still Makes Sense
Woodworking technology has changed dramatically, but workholding is still workholding.
A log needs to stay still while you cut it.
The shaving horse accomplishes that with almost ridiculous simplicity: one pivot, one clamp, one foot pedal and the weight of the person sitting on the bench.
No electricity is required.
There is practically nothing complicated to break.
And unlike a fixed vise, the clamp opens the instant you relax your feet.
That combination of strength and speed explains why the tool continues to show up in green woodworking even when modern shops have access to dozens of powered alternatives.
There is also something satisfying about using a hand tool to shape a tree that was standing not long ago. You can see the grain changing underneath the bark, adjust to knots as you encounter them and remove exactly as much material as necessary.
For the right job, slower does not automatically mean worse.
Final Verdict
For my particular situation, building a shaving horse makes far more sense than continuing to improvise ways of holding long poles.
I need something capable of securing the final couple of feet of 7-to-10-inch-diameter logs while leaving both hands free for a drawknife. A heavy 72-inch bench, wide clamp, adjustable pivot and V-shaped cradle should do exactly that.
The one thing I would not compromise on is supporting long timber properly. A 10-foot green pole should have another sawhorse or log support carrying the far end rather than using the shaving horse as a giant lever.
Beyond that, the design is refreshingly forgiving.
Build it strong. Make the clamp adjustable. Tune the dimensions to your body and the wood you actually intend to work.
Then start making shavings.
Further Reading
For a more traditional chairmaker’s version, Lee Valley offers an excellent overview of its Traditional English Shaving Horse Plan, including the types of woodworking these benches are commonly used for. Lee Valley Traditional English Shaving Horse Plan
For a deeper look at why the foot-operated clamping mechanism works so effectively with drawknives and spokeshaves, Brian Boggs’ classic A New Breed of Shaving Horse is also worth reading. Fine Woodworking — A New Breed of Shaving Horse