
A Beginner’s Guide to Underground Food Storage
There is something almost suspiciously simple about a root cellar. Dig a hole, build a room inside it, put some dirt back over the top, and suddenly you have a storage space that stays cool without an air conditioner or refrigerator. People were taking advantage of the earth’s relatively stable underground temperature long before anyone had compressors, refrigerants, thermostats, or electricity.
The basic idea really is that simple. The construction, however, is not. Once you put a building underground, you have created a structure that must resist soil, water, frost, moisture, and gravity twenty-four hours a day, which means the most important parts of a root cellar are often the parts you never see when it is finished.
A well-built root cellar can store potatoes, carrots, beets, cabbage, apples, preserves, and other foods while consuming virtually no energy. It can also teach you most of the fundamental ideas behind below-grade construction. Understand how to build a root cellar properly and you will already understand some of the major principles involved in basements, storm shelters, underground workshops, and even much more ambitious underground structures.
The goal of this guide is therefore bigger than building a cold room. We are going to look at how underground structures actually work, why they fail, and how a simple root cellar can be constructed without turning your backyard into a permanently damp concrete box.
What Is a Root Cellar?
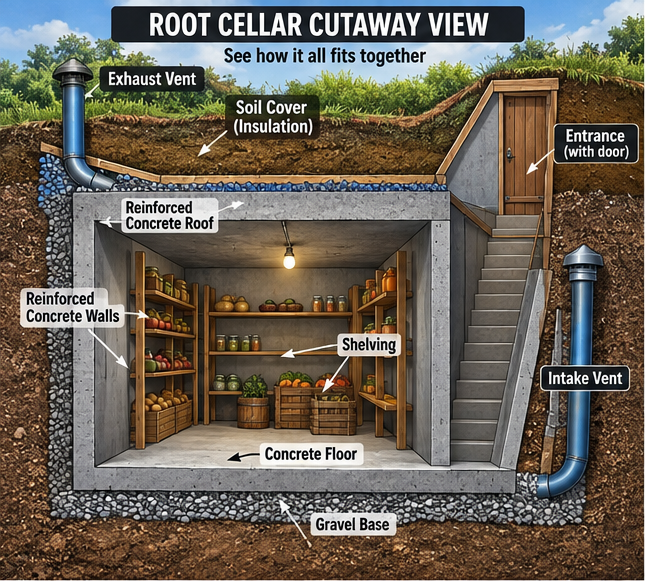
A root cellar is a cool storage space that uses the surrounding earth, ventilation, and seasonal outdoor temperatures to create conditions suitable for storing produce. Instead of mechanically refrigerating the room, you bury much of the structure beneath or against the ground and allow the thermal mass of the earth to moderate temperature swings.
That does not mean the temperature underground never changes. It means it changes much more slowly than the air above ground. On a winter afternoon the outdoor temperature may swing dramatically, while soil deeper underground responds slowly, helping keep the cellar from experiencing the same rapid changes.
Humidity is equally important. Many root vegetables prefer cold, very humid conditions, while onions, garlic, pumpkins, and squash generally prefer drier conditions. University of Missouri Extension, for example, lists carrots, beets, cabbage, and many similar vegetables around 32–40°F or roughly 0–4°C with approximately 90–95% relative humidity, while onions and garlic prefer considerably drier conditions.
That means a root cellar isn’t simply a refrigerator made out of dirt. It is a small environmental-management system.
The Underground Construction Rule That Changes Everything
Above-ground buildings mostly have to deal with weather coming at them from the outside. Underground buildings have weather, soil, and groundwater pressed directly against their walls.
That distinction matters. Soil against a wall produces lateral pressure. Soil placed over a roof becomes permanent dead load. Saturated soil can become considerably more troublesome, while groundwater can produce hydrostatic pressure against tiny cracks and joints that would barely matter above ground.
This is why the roof of a buried cellar should never simply be framed like the roof of a garden shed and then covered with soil. The roof, walls, footings, reinforcement, openings, and connections need to form a structural system designed for the actual burial depth and site conditions. For a walk-in buried structure, structural details are one of the areas where getting plans reviewed or designed by a qualified professional can be money extremely well spent.
The lesson applies to almost every underground structure: the dirt is part of the load.
First, Decide What Kind of Root Cellar You Want
There are several ways to take advantage of earth-cooled storage. Someone storing a few buckets of potatoes does not necessarily need a concrete room large enough to walk into, while someone growing a serious vegetable garden may find a dedicated cellar incredibly useful.
Common options include:
- A buried insulated container for very small-scale storage
- A cellar built into an existing basement
- An earth-bermed cellar with exposed entrance wall
- A cellar constructed into a hillside
- A fully buried walk-in concrete or masonry cellar
For a first major DIY root-cellar project, an earth-bermed or hillside design is often easier to understand than a completely buried chamber. The entrance remains accessible from grade, drainage can potentially run downhill by gravity, and you do not need a vertical hatch and ladder just to retrieve a bag of potatoes.
The example throughout this guide is a small walk-in cellar with reinforced below-grade walls, an engineered structural roof, an exposed or partially exposed entrance, passive ventilation, exterior waterproofing, perimeter drainage, and soil covering the remaining structure.
Step 1: Choose the Site Before You Choose the Cellar
The worst place to build a root cellar is often the place that initially looks most convenient: a low depression where water already collects. If water naturally wants to be there, burying a room in the same location creates a continuous battle against nature.
Look instead for relatively high, well-drained ground. A gentle hillside can be particularly attractive because it gives you an opportunity to place the entrance on the downhill side and potentially drain water away from the foundation using gravity.
Watch the property during heavy rain and during spring thaw. Look for standing water, saturated soil, erosion channels, and areas where roof or driveway runoff concentrates. If the proposed cellar location behaves like a pond for part of the year, rethink the location before trying to solve the problem with increasingly elaborate waterproofing.
Groundwater is even more important. Building Science Corporation notes that below-grade water-control strategies change significantly when construction approaches or extends below the groundwater table, and conditions can vary seasonally.
Step 2: Check Permits, Utilities, and Local Rules
A root cellar may look like an accessory structure, but the minute substantial excavation and foundations become involved, assumptions about small-shed exemptions can become misleading. Ontario’s provincial building-permit guidance specifically lists excavating or constructing a foundation among work requiring a building permit and recommends checking with the local municipality before beginning.
Before excavation, locate underground services. In Ontario, homeowners planning a dig are required to submit a locate request through Ontario One Call, and privately owned services such as lines running to sheds, septic components, or private gas lines may require separate private locating.
Elsewhere, the agency and rules will differ, but the principle doesn’t change. Before you dig, determine:
- Whether a building permit is required
- Required setbacks from property lines and other structures
- Whether conservation, septic, floodplain, or zoning restrictions apply
- Where public and private underground services are located
- Whether engineered drawings are required
- Whether electrical work or drainage connections require separate approvals
This is one of those cases where twenty minutes of checking can prevent an astonishing amount of expensive rework.
Step 3: Lay Out the Cellar
Once you know where the cellar can legally and practically go, establish the footprint with stakes and string. Include the room itself, wall thickness, working space around the exterior, drainage components, and the entrance rather than marking only the finished interior dimensions.
Think about how food will actually move through the building. A beautiful underground room becomes annoying quickly if the stairs are awkward, the doorway barely clears a crate, or shelves reduce the passage to a narrow slot.
Keep the first cellar reasonably small. Underground square footage is considerably more complicated than shed square footage, and a modest room with good shelving can store a surprising amount of produce.
Step 4: Excavate Safely
Excavation is one of the few parts of the project where an apparently harmless DIY decision can become immediately dangerous. Soil walls can collapse with little warning, particularly after rain, vibration, freezing and thawing, or changes in soil conditions.
Never assume an excavation wall is safe simply because it stood vertically yesterday. Ontario safety guidance identifies cave-ins, underground utilities, water, adjacent structures, falling materials, and access problems among excavation hazards, and construction regulations include specific requirements for excavation work.
A large root-cellar excavation may require sloping, benching, shoring, shielding, or another engineered protective system depending on its depth and soil. Keep excavated material and heavy machinery away from unstable edges, provide safe access, and do not climb into an unsupported excavation to “quickly finish something.”
This is also why hiring an excavator operator can make sense even on an otherwise DIY project. Moving the dirt is only half the job; shaping and managing the excavation safely matters just as much.
Step 5: Build a Drainable Base
At the bottom of the excavation, you want a stable foundation rather than muddy native soil that pumps water every time you step on it. The exact foundation design depends on the structure, frost conditions, soil bearing capacity, groundwater, and local requirements.
A common below-grade concept involves properly prepared subgrade, compacted granular material, footings or another engineered foundation system, and drainage provisions beneath and around the structure. The structural floor can then be built as part of the overall foundation design.
The key principle is straightforward: water reaching the bottom of the structure should have somewhere intentional to go. Simply pouring concrete into a damp hole does not make the water disappear.
Step 6: Build Walls That Are Designed to Be Buried
Concrete and reinforced masonry are obvious choices for root cellars because they tolerate damp environments far better than conventional wood framing. But even concrete is not magically immune to water, cracking, or soil pressure.
A buried wall needs to resist earth pushing inward. The deeper the soil, the more significant those forces can become, and saturated soil can complicate them further. Reinforcement, wall thickness, footing dimensions, roof connections, and backfill conditions therefore need to be treated as one structural system rather than a collection of unrelated DIY decisions.
Insulated concrete forms can also be considered, although a root cellar has different thermal goals than a heated basement. You want to limit unwanted outdoor temperature swings while still benefiting from the relatively stable temperature of the surrounding earth.
Whatever system you choose, this is not the place to copy reinforcement spacing from a random photograph online.
Step 7: Treat the Roof as a Structural Deck
The roof may be the most important structural element in the entire cellar. Once soil is placed over it, you have effectively created a floor carrying a permanent load, except the load is sitting above your head.
For that reason, buried root-cellar roofs are commonly approached as reinforced structural slabs, engineered precast systems, arches, or other systems specifically designed for earth loading. The required capacity depends on roof span, soil depth, soil density, water conditions, snow and surface loads, reinforcement, support conditions, and other factors.
Do not assume that closely spaced lumber automatically makes a safe buried roof. Conventional shed rafters are designed primarily for roof coverings and environmental loads—not to become a permanent retaining structure under a mound of soil.
One useful way to think about the entire cellar is this: walls hold the earth back, while the roof holds the earth up.
Step 8: Waterproof the Outside
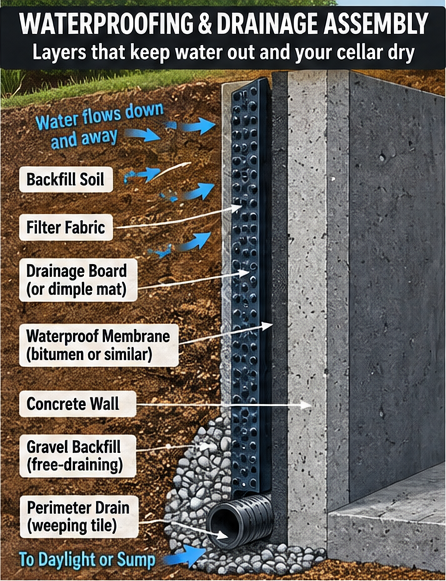
Once the structural shell exists, waterproof it from the side where the water is coming from whenever the design permits. Exterior membranes can bridge minor imperfections and help prevent soil moisture from reaching the structural wall.
Pay special attention to penetrations. Vent pipes, electrical conduits, construction joints, door openings, and transitions between walls and roof are all places where otherwise impressive waterproofing systems can fail.
But waterproofing alone is not enough. Building Science Corporation emphasizes that successful below-grade water management involves preventing water from accumulating against foundation walls and relieving hydrostatic pressure through drainage. Free-draining material, drainage mats, footing drains, grading, and waterproofing work together as a system.
A memorable rule is: don’t build a waterproof box in a swamp and hope the membrane wins forever.
Step 9: Install Exterior Drainage
Place an appropriate drainage layer outside the waterproofed structure so water can travel downward instead of remaining trapped against the wall. Depending on the design, this may involve drainage board, free-draining aggregate, filter fabric, footing drains, or combinations of these components.
The perimeter drain needs a legitimate destination. On suitable sloped land it may be possible to discharge by gravity to an approved daylight location; other sites may require a sump or another drainage strategy.
Finished grading matters too. Surface water should be directed away from the entrance and buried shell rather than allowed to soak directly into the soil above the structure. Building Science Corporation describes keeping rainwater away and draining groundwater before it builds pressure against foundation walls as two fundamental principles of foundation water management.
This is perhaps the single most transferable lesson in underground construction: manage water before trying to resist water.
Step 10: Build the Entrance Like an Exterior Doorway
The entrance is often the weakest thermal and waterproofing point in a root cellar. It is also the part you interact with constantly, so it deserves more thought than simply attaching an old shed door.
A hillside cellar can have a conventional vertical doorway in the exposed front wall. A cellar entered from above may instead have stairs descending through a weather-protected entrance, sometimes beneath the traditional sloping bulkhead doors people associate with old farm cellars.
Either way, use a durable, weather-resistant, insulated exterior door and seal the frame properly. In very cold climates, a short vestibule with two doors can further reduce sudden temperature changes when the cellar is opened.
Make sure exterior water cannot run down the stairs. A drain at the base of a stairwell is useful only when that drain has somewhere dependable to discharge.
Step 11: Install Passive Ventilation
Produce does not become biologically inactive when it leaves the garden. Stored vegetables continue to respire, and a closed underground room also accumulates humidity and odors. University of Minnesota Extension specifically notes that harvested vegetables continue to breathe and that cellars require ventilation as well as protection from rodents.
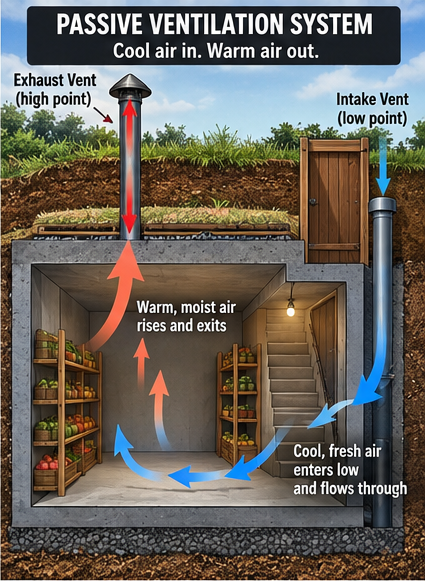
A simple passive design uses two adjustable vents. The fresh-air intake terminates low in the cellar, while the exhaust opening terminates near the ceiling and exits higher outside. Separating the openings encourages air to travel through the room instead of immediately entering one vent and leaving through the other.
Both exterior openings should be protected from rain, snow, insects, and rodents. Dampers allow airflow to be adjusted seasonally, because maximum ventilation is not always desirable.
Cold autumn nights can be used to pull the cellar temperature downward. During extremely cold weather, however, unrestricted outdoor airflow can freeze the produce you were trying to preserve, so the system needs monitoring and adjustment rather than being treated as permanently wide open.
Step 12: Backfill Carefully
Once the shell, waterproofing, drainage, insulation, penetrations, and structural work are inspected and ready, backfilling can begin. This is a surprisingly easy stage at which to damage work that took weeks to complete.
Protect waterproofing and drainage layers from rocks and equipment. Backfill in the manner required by the wall and foundation design rather than dumping a huge pile against one side of the structure and assuming the wall will tolerate it.
The roof should receive only the amount and type of cover it was designed to carry. More dirt does not automatically make the cellar better insulated; it definitely does make the roof carry more weight.
Shape the finished surface so rainwater sheds away. Vegetation can eventually stabilize the soil and turn an earth-covered cellar into something that almost disappears into the landscape.
Step 13: Build the Interior for Airflow
Root cellar shelving does not have to be complicated. Simple removable shelves and crates often work better than elaborate cabinetry because air can move around the produce and the interior can be cleaned periodically.
Leave some breathing room around stored food rather than packing every surface solid. Keep vulnerable produce off potentially damp floor surfaces and inspect the cellar periodically for mold, rodents, spoiled vegetables, condensation, or standing water.
Install a thermometer and hygrometer before filling the cellar. Without actual measurements, statements such as “it feels pretty cold and damp in there” do not tell you much.
You may eventually discover that different parts of the cellar develop slightly different conditions. That can actually be useful, allowing you to place crops according to their storage requirements.
What Should You Store in a Root Cellar?
Root cellars are particularly good for many root vegetables and hardy crops, but different foods should not automatically be piled together. Carrots, beets, turnips, rutabagas, cabbage, and similar crops generally benefit from cold, humid conditions, while onions and garlic prefer drier storage and winter squash generally prefers warmer, drier conditions.
Fruit creates another complication. Apples and pears release ethylene as they ripen, which can accelerate deterioration or sprouting in some vegetables. University of Missouri Extension recommends separating fruits from vegetables for this reason.
A serious root cellar can therefore be organized into zones rather than treated like one giant refrigerator. Separate crates, shelving areas, ventilated compartments, or even secondary rooms can help when storing a large harvest.
The Biggest Root Cellar Mistakes
Most failures aren’t caused by forgetting shelves or choosing the wrong door handle. They come from getting the basic underground-building principles wrong.
Watch particularly for these problems:
- Building in a naturally wet location
- Ignoring seasonal groundwater
- Entering an unsafe unsupported excavation
- Treating waterproofing as a substitute for drainage
- Allowing roof or surface runoff to drain toward the cellar
- Using a roof that was never designed for soil loading
- Damaging waterproofing while backfilling
- Forgetting ventilation
- Allowing vents to admit rain, snow, insects, or rodents
- Packing produce so tightly that air cannot circulate
- Assuming every crop wants identical humidity and temperature
- Covering the structure with more soil than the roof was designed to support
- Building first and asking about permits afterward
These mistakes also explain why some century-old cellars remain remarkably functional while newer DIY projects become damp within their first season. Underground construction rewards good fundamentals more than fancy materials.
What a Root Cellar Teaches You About Building Underground
Once you understand a root cellar, a lot of underground construction begins to make sense. Nearly every buried structure has to solve the same fundamental problems: excavation, structural earth loads, roof loading, groundwater, drainage, waterproofing, thermal control, ventilation, penetrations, access, and emergency safety.
A storm shelter, workshop, bunker, buried utility room, or underground addition may add considerably more complicated requirements, but it does not escape those basic rules. In fact, human occupancy adds new ones. An occupied underground room may need dedicated emergency egress, mechanical ventilation, fire and electrical provisions, soil-gas control, radon mitigation, sanitation, and much stricter structural engineering.
Radon is one example of why the distinction matters. Health Canada notes that radon originating in soil and rock can enter structures through foundation cracks, construction joints, drains, sumps, and service penetrations, and concentrations are often higher in poorly ventilated below-grade spaces.
So although building a root cellar gives you an excellent introduction to underground construction, it should not be interpreted as a blueprint for simply enlarging the room and calling it a bunker. The principles transfer. The engineering requirements do not necessarily transfer unchanged.
Is Building a Root Cellar Worth It?
If all you want to store is twenty pounds of potatoes, probably not. There are much simpler buried-container and insulated-storage solutions that can provide some of the same benefits without excavating enough soil to build a room.
But for someone with a serious vegetable garden, homestead, orchard, or interest in low-energy food storage, a well-designed root cellar can be incredibly useful. There are no compressors humming away, no large refrigerator consuming electricity year-round, and relatively few moving parts to fail.
There is also something satisfying about the simplicity of it. You are essentially building a structure that cooperates with the temperature of the earth rather than overpowering the environment with machinery.
The trick is respecting the difference between simple principles and simple construction. A root cellar works because the earth is powerful enough to moderate temperature—but that same earth is powerful enough to push against walls, load roofs, carry water, and collapse into excavations.
Build around those realities and a root cellar can last for decades. Ignore them, and you may end up constructing the world’s most expensive underground puddle.
Resources
For detailed produce-storage temperatures and humidity requirements, see the University of Missouri Extension guide Home Storage of Fruits and Vegetables in Root Cellars. University of Missouri Extension — Root Cellar Storage Guide
For additional information about harvesting and storing different vegetables, see the University of Minnesota Extension’s vegetable-storage guide. University of Minnesota Extension — Harvesting and Storing Vegetables
For a much deeper explanation of groundwater, hydrostatic pressure, drainage layers, waterproofing, and below-grade construction, Building Science Corporation’s material on below-grade water management is an excellent technical resource. Building Science Corporation — Below Grade Water Management
Ontario readers can review provincial building-permit guidance before starting excavation or foundation work. Ontario — Building Permit Guide
Anyone excavating in Ontario should also arrange utility locates before digging. Ontario One Call — Homeowner Utility Locates