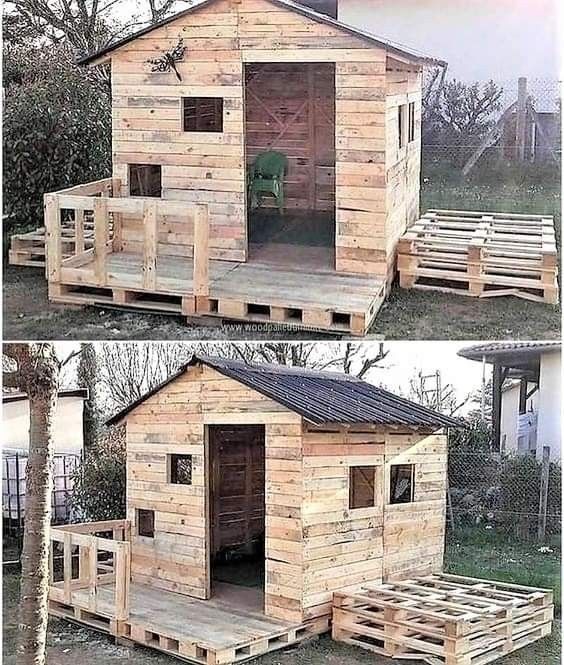
FINKLERDIY BLUEPRINT: 8×12 Tiny Home With Loft (2×4 Framed, Pallet Siding, Gable Roof)
Foundation: Deck blocks
Footprint: 8 ft × 12 ft
Wall height: 8 ft
Roof: Gable
Loft: Yes (sleeping/storage)
Insulation: Full 4-season
Exterior: Pallet siding + OSB
Interior: Not finished (frame-only unless you add paneling later)
🧱 SECTION 1 — FOUNDATION PLAN (Deck Blocks)
Layout (Top View)
12 ft length
[□——□——□——□]  front (4 blocks)
[□——□——□——□]  back  (4 blocks)
8 ft width
You will need:
- 8 deck blocks (4 front, 4 back; spaced 4’ apart)
- 3 pressure-treated 4×4 skids (12 ft each)
Steps:
- Level the ground where the shed will sit.
- Set 4 deck blocks along the front line (12 ft length).
- Set 4 deck blocks along the back line.
- Place the three 4×4 skids on top of the deck blocks:
- One skid at the left edge
- One at the right edge
- One centered (about 4 ft apart)
- Ensure all skids are level in all directions.
Use shims or dig down as needed.
This creates a strong floating foundation suitable for Canadian climates.
🪚 SECTION 2 — FLOOR FRAMING (8×12 Platform)
Materials:
- 2×6 lumber for joists
- ¾″ tongue-and-groove plywood for floor sheathing
- Construction adhesive + nails/screws
Floor Frame Layout:
- Joists run the 8 ft direction (front to back).
- Rim joists: 2×6 × 12 ft (2 pieces)
- Joists: 2×6 × 8 ft (7 pieces @ 16” OC)
Build Steps:
- Build a 12×8 ft rectangle using the two rim joists + two 8 ft boards.
- Install the remaining joists at 16” on-center.
- Nail/screw joists into rim joists.
- Glue and screw down your ¾” T&G plywood.
Your floor is now strong enough for beds, stoves, desks, etc.
🪵 SECTION 3 — WALL FRAMING (2×4 Construction, 8 ft Walls)
We will frame four separate walls and stand them up.
Wall Heights:
- 8 ft wall height (standard for loft support + code-like)
2×4 Wall Stud Layout:
- Studs spaced 16” on-center
- Top plate + bottom plate
- Double top plate for structural strength
Window Framing:
Since you want 2 windows, we’ll place them like this:
- One window on the 12 ft side
- One window on the opposite 12 ft side
Both approx. 24×36, but you can adjust.
Door Placement:
The door will be on the 8 ft front wall.
You can use a standard 36” exterior door.
🔨 WALL 1 — FRONT WALL (8 ft wide)
Includes:
- One door
- Standard 2×4 framing around it
Materials:
- 2×4 × 8 ft — studs
- 2×4 × 8 ft — plates
- Header: 2×6 with plywood sandwich
- King studs + jack studs
Layout:
- Door opening: 38” rough opening
- Header height: 80”
- Two jack studs support the header
- One king stud each side
- Rest are 16″ OC studs
🔨 WALL 2 — BACK WALL (8 ft)
- No openings
- Simple stud wall:
- 2×4 × 96” studs
- 16″ OC spacing
- Top + bottom plates
- Double top plate overlaps corners
🔨 WALL 3 & 4 — SIDE WALLS (12 ft)
Each side wall has one window.
Window framing:
- Typical rough opening: 24×36”
- Header: 2×6 + ½” plywood
- King studs + jack studs
- Cripple studs above and below
Wall Structure:
- 2×4 × 12 ft top and bottom plates
- Vertical studs 16″ OC
- Install window framing at ~40” from floor (eye-level)
🛠️ SECTION 4 — STANDING THE WALLS
Steps:
- Stand back wall first (simplest).
- Stand one side wall, attach to back wall.
- Stand the other side wall.
- Stand front wall with door.
- Nail walls to floor and to each other.
- Install second top plate, staggering seams for strength.
Your structure is now fully upright.
🏠 SECTION 5 — ROOF FRAMING (Gable Roof)
Why gable roof?
- Allows loft space
- Easy to build with 2×6 rafters
- Good snow load performance
- Classic tiny house look
Materials:
- 2×6 rafters, cut with simple plumb cuts
- Ridge board (2×8)
- Collar ties (2×4)
- OSB roof sheathing
- Metal roofing or shingles
Roof Pitch:
I recommend 4/12 pitch — easy, safe, and gives loft space.
Rafter Construction:
- Span: 8 ft
- Use 2×6 lumber
- Birdsmouth cut sits on wall top plate
- Rafters spaced 24” OC (fine with 2×6 and light metal roofing)
Ridge Board:
- Use a centered 2×8 as ridge board
- Rafters attach to it with screws or nails
- Use temporary supports while installing rafters
Collar Ties:
Install 2×4 collar ties every second rafter pair to prevent rafter spread.
🛏️ SECTION 6 — LOFT FRAMING
Loft Size:
- Standard: 8 ft width × 6 ft depth
- Good for one adult sleeping
Loft Joists:
- Use 2×6 joists, 16” OC
- Install joists at height of 6.5 ft from floor
- Attach joists into the side wall studs using joist hangers or ledgers
Loft Floor:
- Use 2× blue construction lumber or plywood
- ¾” plywood recommended
Ladder:
- Build simple vertical ladder from 2×4
- Attach securely to loft edge
🧊 SECTION 7 — INSULATION (4-Season)
Because you want it winter-capable:
Walls (R-14 to R-20)
- Use Roxul/rockwool for moisture & fire resistance
Roof (R-22 or higher)
- Use deep batts in 2×6 rafters
Floor (R-20)
- Insulate between floor joists from below
- Staple vapor barrier
- Cover bottom with plywood or rigid foam
Vapor Barriers:
- Interior side: polyethylene vapor barrier
- Exterior side: house wrap (Tyvek)
This prevents:
- Rot
- Mold
- Heat loss
- Condensation
🪵 SECTION 8 — EXTERIOR PALLET SIDING
Since you chose 2×4 walls + pallets as siding, here’s the system:
Step 1 — Skin the walls with OSB
- 7/16 OSB
- Nail to studs
- This gives shear strength (absolutely necessary)
Step 2 — Add house wrap
- Tyvek or similar
- Staple on
Step 3 — Prepare pallets
Options:
- Cut pallets into slats for vertical board-and-batten look
- Use full-length pallet boards for rustic horizontal siding
Step 4 — Install pallet siding
- Nail pallet boards on top of OSB
- Leave ⅛” gap between boards
- Stagger seams
Step 5 — Add trim
- Use 1×4 or pallet boards for window & door trim
💧 SECTION 9 — WEATHERPROOFING
Your tiny house will survive Canadian weather if you:
- Extend eaves at least 12”
- Install drip edges under shingles
- Paint or stain pallet siding
- Seal gaps around windows/doors
- Install proper flashing
🪑 SECTION 10 — MATERIAL LIST (SUMMARY)
Lumber:
- ~45 × 2×4 studs
- ~20 × 2×6 joists + rafters
- 3 × 4×4 skids
- 7 sheets OSB
- Loft platform plywood
- Floor plywood
- Ridge board 2×8
- Trim boards
- Unlimited pallets (your supply)
Hardware:
- 3” construction screws
- Joist hangers
- Deck screws for siding
- Roofing nails
- Vapor barrier
- House wrap
- Insulation
Roofing:
- Metal roofing kit OR shingles
- Drip edge
- Ridge cap
🔥 SECTION 11 — BUILD SEQUENCE (START TO FINISH)
- Prepare ground
- Install deck blocks & skids
- Frame floor
- Sheath floor with plywood
- Frame back wall
- Frame side walls
- Frame front wall
- Stand walls & secure
- Install double top plate
- Frame gable roof
- Install rafters, ridge board
- Add collar ties
- Install roof sheathing
- Install roofing
- Install loft joists and floor
- Insulate walls, roof, floor
- Install vapor barrier
- Sheath walls exterior
- Install house wrap
- Install pallet siding
- Install windows & door
- Add trim
- Paint/seal exterior