
How to Sharpen and Replace Ride-On Mower Blades: A Step-by-Step DIY Guide
A ride-on mower that starts leaving strips of grass, cutting unevenly, vibrating, or shredding the lawn instead of leaving a clean finish is usually due for some attention underneath the deck. In many cases, the fix is simple: sharpen the mower blades or replace them with a new set. In other cases, the blades may only be part of the problem, and the real issue could be a loose deck belt, packed grass, a worn spindle, or a deck that is no longer level.
For anyone with a large yard, rural property, lawn tractor, or zero-turn mower, blade maintenance is one of those jobs that is worth learning. A clean-cut lawn looks better, but it also puts less strain on the mower and helps prevent the grass from developing ragged brown tips after mowing. The first time you do it, the job can feel intimidating because you are working under a heavy machine and dealing with bolts that may not have moved in years. Once you understand the process, though, it becomes a manageable piece of regular DIY maintenance.
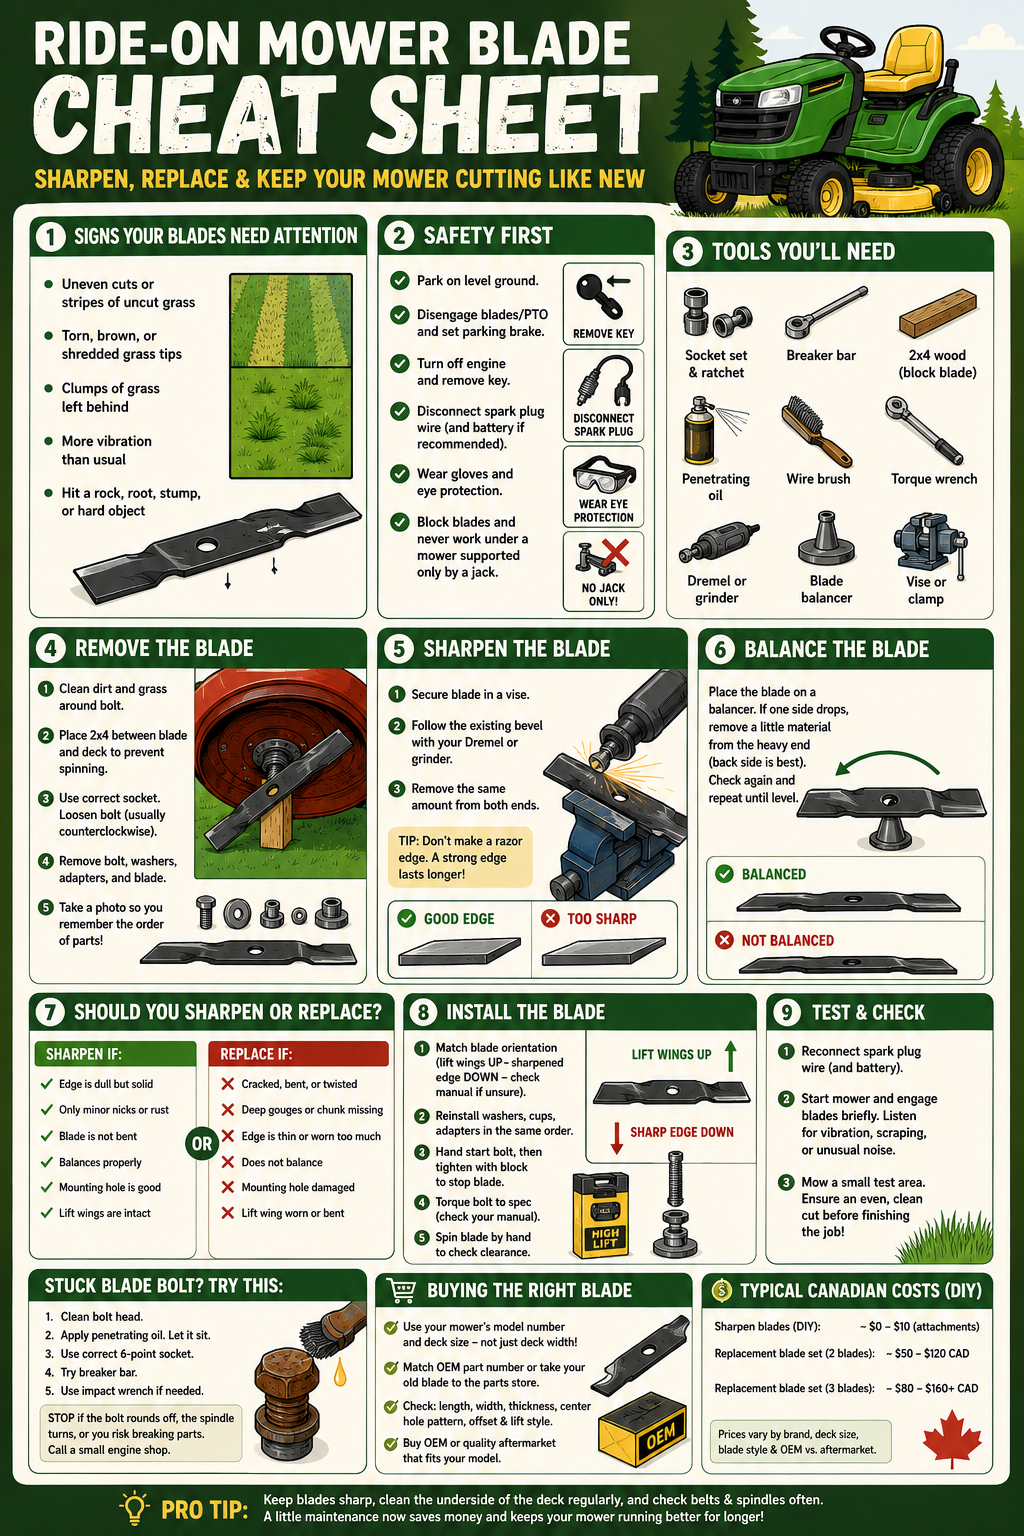
Quick answer: Most ride-on mower blades can be sharpened several times as long as they are not cracked, bent, badly worn, or impossible to balance. To buy replacements, use your mower’s model number and blade part number instead of shopping only by deck width. For many common Canadian ride-on mowers, a replacement blade set often falls somewhere around $50 to $120 CAD, depending on the brand, deck size, blade style, and whether you choose OEM or aftermarket parts.
Start by Making Sure the Blades Are Actually the Problem
Dull blades are one of the most common reasons a mower starts doing a poor job, but they are not the only reason. Before you buy parts or start pulling the deck apart, look closely at the lawn after mowing. If the tips of the grass look torn, shredded, or brown a day or two later, the blades are likely dull and tearing through the grass instead of slicing it cleanly.
Another common sign is thin strips of uncut grass between mower passes. This can happen when the cutting edges are worn down, when one blade is not spinning properly, or when grass is packed under the deck and blocking airflow. If you have a two-blade or three-blade mower deck and one side looks worse than the other, inspect each blade individually instead of assuming they are all equally worn.
Extra vibration is something to take seriously. If the mower suddenly shakes more than usual, especially after hitting a rock, stump, root, curb, or hidden piece of metal, shut it down and inspect the blades before mowing again. A bent or unbalanced blade can damage spindle bearings, loosen hardware, and make a simple maintenance issue more expensive.
Common signs that it is time to inspect your mower blades include:
- Grass tips look ragged, torn, or brown after mowing.
- The mower leaves strips or patches of uncut grass.
- One side of the deck cuts lower or worse than the other.
- The mower deck vibrates more than it used to.
- You hear rattling, scraping, grinding, or unusual belt noise.
- You recently hit something hard while mowing.
- The mower drops clumps of grass instead of discharging it evenly.
How Much Does It Cost to Sharpen or Replace Ride-On Mower Blades?
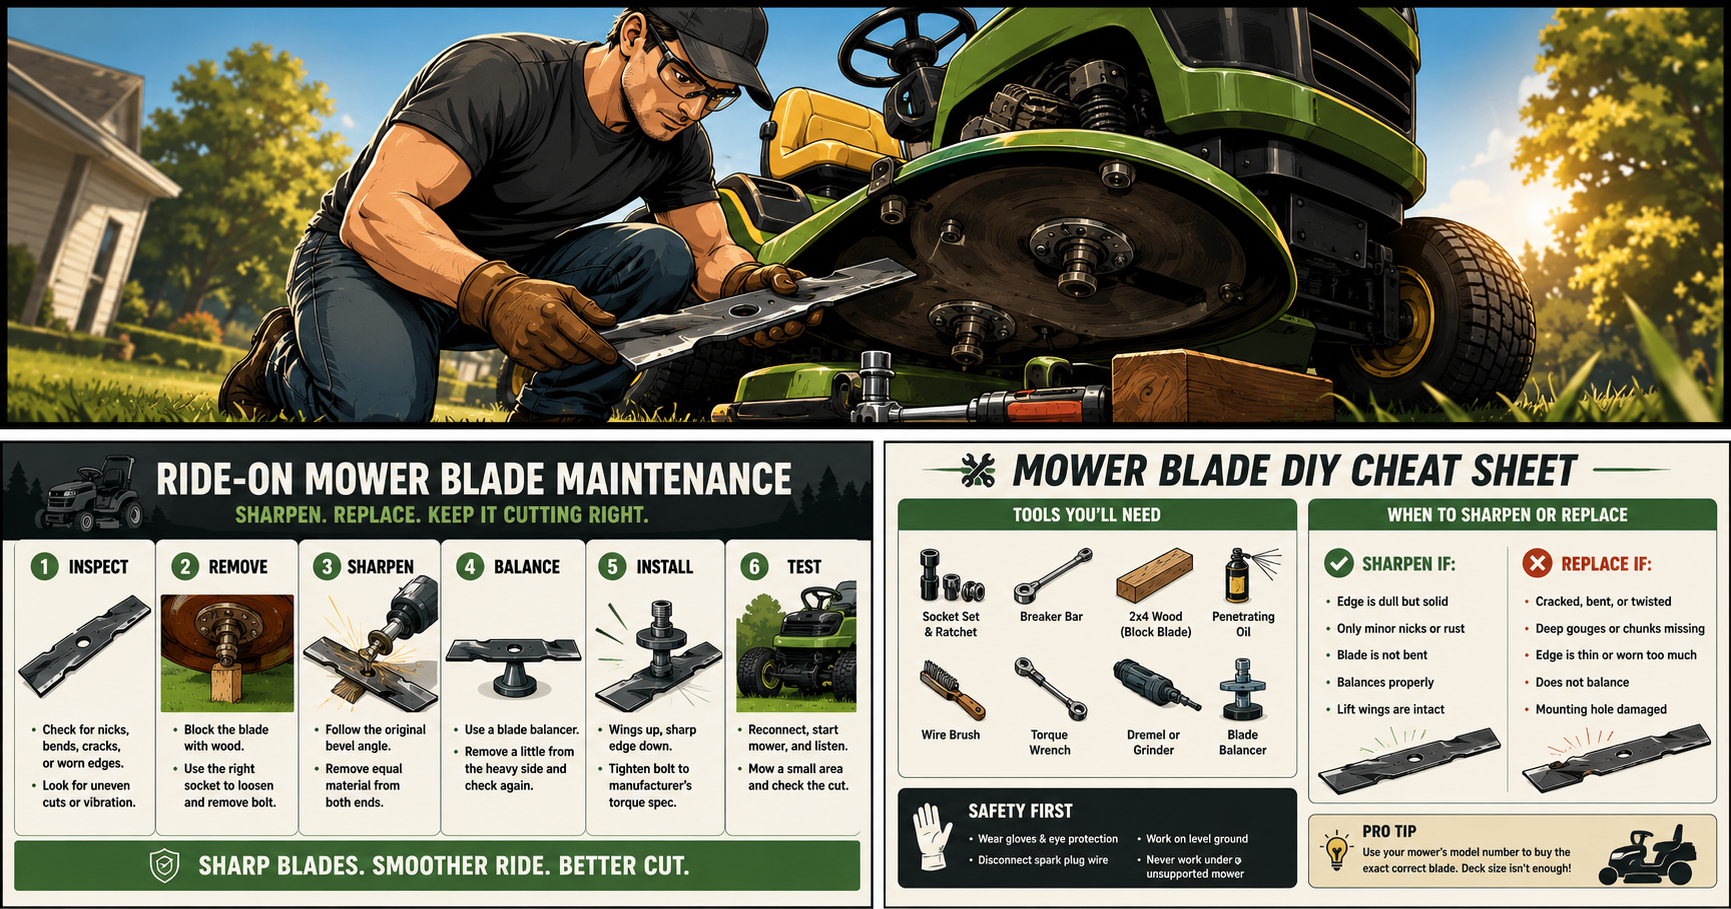
Sharpening your own blades is usually the cheapest option, especially if you already own a Dremel, drill attachment, file, bench grinder, or angle grinder. For a basic touch-up, you may only need a fresh grinding stone or flap-wheel attachment and a simple blade balancer. The actual sharpening job can cost almost nothing if the blades are still in good shape.
Replacing the blades costs more, but it is often the smarter move when the old blades are bent, cracked, thin, heavily chipped, or worn down from repeated sharpening. For many common lawn tractors, a two-blade aftermarket or OEM replacement set may land somewhere around $50 to $120 CAD. Larger mower decks, specialty mulching blades, zero-turn sets, and premium OEM blade kits can cost more than that.
A repair shop can save you frustration if the blade bolt is seized, the mower deck has to come off, or you suspect a spindle or belt problem. However, labour adds up quickly once a shop has to inspect the mower, remove the deck, diagnose the issue, install new parts, and test everything. Doing the blade work yourself is a good way to save money, but only if you stay within your comfort level and avoid damaging the spindle, blade adapter, or deck hardware.
As a rough DIY budget, plan for the following:
- A basic blade balancer: a small one-time tool purchase.
- Dremel or grinder attachments: usually inexpensive if you already own the tool.
- Common replacement blade sets: often around $50 to $120 CAD.
- Larger decks, OEM sets, or specialty blades: often more than $100 CAD.
- Shop service: can become expensive quickly once deck removal, diagnosis, or spindle work is involved.
Do Not Buy Blades Based Only on Deck Width
This is the mistake that catches a lot of first-time buyers. Someone has a 42-inch mower deck, searches for “42-inch mower blades,” and buys a set that looks close enough. Then the blades arrive with the wrong centre hole, wrong mounting pattern, wrong length, or wrong blade shape.
A 42-inch deck does not mean every 42-inch blade will fit your mower. Different brands use different mounting systems, and even models from the same manufacturer can use different blade designs. Some blades have round centre holes, while others use star-shaped mounts, bow-tie mounts, or special blade adapters.
Before buying anything, find the mower’s model number and serial number. On many ride-on mowers, the identification tag is under the seat, on the frame, near the engine, or around the mower deck. Take a clear picture of the tag with your phone so you do not have to crawl around looking for it again later.
When shopping for replacement blades, have this information ready:
- Mower brand and full model number.
- Serial number, if available.
- Deck size.
- Number of blades on the deck.
- Original blade part number, if you can read it.
- A photo of the old blade and its centre mounting hole.
- The old blade itself, if you are visiting a local parts shop.
The safest route is usually to use the manufacturer’s parts lookup or visit a local small-engine dealer. Give them the model number, and they can tell you the exact blade part number for your deck. Once you know that number, you can compare OEM and aftermarket choices with confidence instead of guessing.
Where to Buy Ride-On Mower Replacement Blades
For a first-time blade replacement, a local outdoor-power-equipment shop is often the easiest option. Bring in the old blade, your mower model number, and a photo of the mower’s identification tag. A good parts counter can match the blade quickly and make sure you are not buying something that is merely close.
You can also find replacement blades through manufacturer parts websites, Home Depot, Canadian Tire, Home Hardware, Amazon, Walmart Marketplace, and specialized outdoor-equipment parts stores. Once you have the exact OEM part number, online shopping becomes much easier because you can compare prices and read compatibility lists without relying on a vague listing title.
OEM blades are usually the safest option when you are unsure what your mower needs. They are designed for that specific deck and are more likely to give you the cut quality the mower had when it was new. Quality aftermarket blades can also be excellent, but only buy them when they clearly list your mower model or the OEM part number they replace.
Avoid listings that only say “universal riding mower blade” unless you have confirmed every important measurement. Blade length is only one part of the fitment. The centre-hole pattern, width, thickness, offset, lift wing, and blade style all matter.
Which Blade Style Is Best for a DIY Homeowner?
Most homeowners should replace their blades with the same type that originally came on the mower. That keeps the mower cutting the way the deck was designed to cut and avoids problems with airflow, bagging, or grass discharge. If you are unsure, standard replacement blades or 3-in-1 blades are usually the most practical choice.
A standard or 3-in-1 blade is designed to handle regular side discharge, basic mulching, and bagging. This is the safest all-around option for most large lawns and rural properties. It works well for normal grass maintenance and is usually easy to find.
Mulching blades are designed to keep clippings circulating under the deck longer so they are chopped into smaller pieces. They can work very well when you mow frequently and the grass is dry and not overly tall. However, they can clog more easily if you are cutting long, wet grass or trying to mow after letting the lawn get away from you.
High-lift blades create more airflow under the deck and can be useful for bagging grass or picking up leaves. They are not automatically better for every mower, though. They can use more power, create more noise, and kick up more dust, so it is best to use them only when your mower deck is designed for that blade style.
Tools You Will Need Before Starting
You do not need a professional repair shop, but the right tools make this job much easier. The biggest thing is using the correct socket on the blade bolt. A loose socket can round off the bolt head, and that can turn a simple blade swap into a headache.
A good basic tool setup includes:
- Safety glasses and work gloves.
- A socket set with the correct six-point socket.
- Ratchet and breaker bar.
- A short piece of 2×4 lumber to block the blade.
- Penetrating oil for rusty or stuck bolts.
- Wire brush for cleaning the bolt head.
- Dremel with a grinding stone, sanding drum, or flap-wheel attachment.
- Bench vise or sturdy clamp.
- Blade balancer.
- Torque wrench.
- Camera or phone for taking photos before removing hardware.
A cone-style mower blade balancer is inexpensive and worth buying. You can use simple improvised methods in a pinch, but a proper balancer makes it easier to see whether one end of the blade is heavier after sharpening. Since imbalance can damage bearings and create vibration, this is one of those small tools that pays for itself.
How to Safely Prepare the Mower
Start with the mower parked on level, firm ground. Turn the engine off, disengage the mower blades or PTO, set the parking brake, and remove the key. If you have just finished mowing, let the engine and exhaust cool down before you start working.
Disconnect the spark plug wire or wires so the engine cannot accidentally start. If your mower manual recommends disconnecting the battery for service work, do that as well. The goal is to eliminate any chance of the mower starting while your hands are near the blade area.
Raise the mower deck to its highest cutting position and see whether you can safely access the blade bolts. Some mower designs allow access from the side without lifting the mower, while others are easier to work on with the deck removed. Never crawl beneath a ride-on mower that is supported only by a hydraulic jack, loose blocks, or an improvised setup.
If access is poor, removing the mower deck may actually be the safer and easier option. It takes longer, but it gives you room to inspect the belt, clean packed grass from the underside, check the spindle housings, and deal with a stubborn blade bolt without fighting the whole mower.
How to Remove a Ride-On Mower Blade
Before you loosen anything, clean the area around the blade bolt. Packed grass, dirt, and rust can prevent the socket from seating properly. A wire brush helps expose the bolt head and gives the socket a better grip.
Next, place a short piece of 2×4 between the blade and the mower deck so the blade cannot turn while you loosen the bolt. Position the wood carefully so it braces the blade firmly without bending it or damaging the deck. Keep your hands away from the sharp edge while doing this, even if the blade is dull.
On many residential ride-on mowers, the blade bolt loosens counterclockwise when you are looking directly at the bolt head. However, mower designs vary, so check your owner’s manual before applying serious force. Use a six-point socket rather than an adjustable wrench or a loose twelve-point socket, because it grips the bolt much better.
Once the bolt loosens, remove it slowly along with any washers, cups, spacers, blade supports, or adapters. Keep the pieces together in the order they came off. Take a quick photo before moving them around, because reinstalling the hardware in the wrong order can cause problems later.
What to Do if the Blade Bolt Is Stuck
A blade bolt that has not been removed for several years can be extremely stubborn. Moisture, rust, grass buildup, and normal heat cycles can make it feel like the bolt has been welded in place. This is where people often get frustrated and start using too much force, which is how a routine blade job turns into a damaged spindle or rounded bolt head.
Start by cleaning the bolt head thoroughly with a wire brush. Spray penetrating oil around the bolt and blade mounting area, then give it time to work. Twenty to thirty minutes is a reasonable starting point, although heavily rusted hardware may benefit from a second application.
After the oil has had time to work, try a properly fitted six-point socket and breaker bar. Apply steady pressure while keeping the socket straight and fully seated. Avoid sudden jerking or bouncing on the breaker bar, because that increases the chance of slipping off the bolt or damaging the threads.
If the breaker bar does not work, a cordless impact wrench can often break the bolt loose with short bursts. The impact action is sometimes more effective than trying to apply massive leverage by hand. Stop if the bolt head starts rounding, if the spindle turns with the bolt, or if you feel like you are about to break something expensive.
The safest order to try is:
- Clean the bolt head with a wire brush.
- Apply penetrating oil and let it sit.
- Use a six-point socket and breaker bar.
- Reposition the wood block so the blade is braced properly.
- Try a cordless impact wrench in short bursts.
- Stop and bring it to a small-engine shop if the bolt begins rounding or the spindle assembly seems damaged.
Do not use a torch under a mower deck. There may be belts, dry grass, fuel lines, grease, and other materials nearby that do not belong anywhere near an open flame. It is also smart to avoid extreme “cheater bar” setups unless you fully understand the risk, because it is easy to twist or damage parts that cost more than having a shop remove the bolt properly.
How to Sharpen Ride-On Mower Blades With a Dremel
A Dremel works well for regular touch-ups and moderately dull mower blades. It is slower than a bench grinder or angle grinder, but that is not always a bad thing for a beginner. The slower pace makes it easier to remove metal gradually instead of accidentally grinding away too much.
Clamp the blade securely in a vise or sturdy clamp with the cutting edge facing upward. Do not hold the blade in one hand while running the Dremel with the other. Look closely at the existing bevel on the blade and follow that shape rather than trying to create a completely new angle.
Move the Dremel steadily along the cutting edge in smooth passes. Do not stay in one spot too long, because overheating the metal can weaken the edge and remove too much material. Sharpen both cutting ends of the blade, removing roughly the same amount of metal from each side whenever possible.
The goal is not to create a razor-sharp edge like a kitchen knife. A mower blade needs a durable, slightly blunt cutting edge that can survive normal impacts with grass, dirt, and occasional debris. If you grind the blade too thin, it will dull faster, chip more easily, and become weaker.
If the blade has deep nicks, heavy rust, or a large amount of missing material, a Dremel may not be the best tool for the job. At that point, a bench grinder, angle grinder, or replacement blade may be more practical. There is no prize for saving a blade that is already near the end of its useful life.
Balance the Blade Before Reinstalling It
Balancing the blade is one of the most important steps in the entire process. A blade that is heavier on one end can cause vibration, and that vibration can wear out mower spindles, loosen bolts, stress the belt, and make the mower feel rough. The mower may still cut grass, but it will be hard on the machine.
Place the blade on a cone-style blade balancer using the centre mounting hole. If the blade stays level, it is balanced well enough for regular mowing. If one end drops, that end is heavier and needs a small amount of metal removed.
Remove tiny amounts from the heavy end, preferably from the back side or non-cutting area of the blade rather than making the cutting edge thinner. Check the balance again after every small adjustment. Going slowly is important because it is easy to remove more metal, but impossible to put it back.
When You Should Sharpen the Blade and When You Should Replace It
A blade does not need replacement every time it gets dull. A solid blade with normal wear can usually be sharpened several times. The key is inspecting it honestly instead of trying to save money by reinstalling something that is unsafe or worn out.
Sharpen the blade when the edge is simply dull, lightly nicked, or has minor surface rust. Replace the blade if it is cracked, bent, twisted, deeply gouged, worn thin, badly corroded, or impossible to balance. Also replace it if the centre mounting hole is damaged or if the lift wing has been bent or worn down.
Never try to straighten a bent mower blade or weld a cracked one. The metal can weaken, and a blade failure at full mowing speed is not something to gamble with. A replacement blade is much cheaper than damage to the mower, nearby property, or a person.
How to Install the New or Sharpened Blade Correctly
Before installing the blade, compare it carefully with the old one. Make sure the mounting hole matches, the blade length is correct, and the lift wings are shaped the same way. If the blade has a stamp that says “GRASS SIDE,” “THIS SIDE UP,” or similar wording, follow that marking.
Many ride-on mower blades install with the raised lift wings facing upward toward the mower deck and the sharpened cutting edge facing down toward the grass. However, do not rely on memory alone. If there is no clear marking, look at your photo of the original blade and confirm the correct orientation in your mower’s owner’s manual.
Reinstall all washers, spacers, blade supports, cups, and adapters in the same order they came off. Start the blade bolt by hand first to make sure it is threading correctly. Cross-threading a blade bolt can turn a basic job into a repair that requires replacing the spindle assembly.
Use the wood block again to stop the blade from spinning while tightening the bolt. Then use a torque wrench and tighten the bolt to the exact specification in your mower’s manual. Do not guess at the torque, because different mower models use different bolt sizes, spindle designs, and tightening requirements.
Test the Mower Before Calling the Job Finished
Before reconnecting the spark plug wires or battery, make sure all tools are out from under the deck. Spin each blade by hand and check that it clears the deck normally. Look for anything rubbing, scraping, or sitting out of place.
Start the mower outdoors on level ground and engage the blades briefly. Listen closely for vibration, knocking, scraping, grinding, or belt squeal. Shut the mower down right away if it does not sound normal.
If everything sounds good, mow a small test strip. Look behind you to see whether the grass is being cut cleanly and evenly. A properly sharpened or replaced blade should leave a noticeably cleaner cut with fewer missed strips and less tearing at the tips of the grass.
If one side still cuts badly after the blade work, inspect the deck belt, spindle bearings, blade adapters, and deck level. Also check tire pressure, because one low tire can make the whole deck sit unevenly. At that point, the blades may be fine, and the issue may be elsewhere in the mower deck system.
Final Thoughts
Sharpening or replacing ride-on mower blades is one of the best DIY maintenance jobs to learn because it can save money, improve cut quality, and help your mower last longer. It is not difficult once you understand the basics, but it does reward patience. Take clear photos before removing hardware, use the proper socket, balance the blade after sharpening, and never force damaged parts just to finish the job.
Your Dremel is a good tool for regular blade touch-ups, especially if the blades are still solid and only moderately dull. But if the blade is cracked, bent, badly worn, or too damaged to balance, replacement is the smarter move. The most important thing is ordering the right blade by using your mower’s model number and part number instead of guessing based on deck width alone.
Do the job carefully once, save the blade part number somewhere handy, and the next time your mower starts leaving rough stripes in the lawn, you will know exactly where to start.
Related external links
- Husqvarna: How to inspect and replace blades on a ride-on mower — a solid manufacturer guide covering blade inspection and replacement.
- John Deere: Lawn mower parts and blade maintenance — useful for blade sharpening, balancing, deck cleaning, and finding parts by mower model.
My mower’s blades most def need replacing but that bolt is on there tight. I will try the wire brush and penetrating oil combo though. I’m guessing a cordless impact wrench is just an impact driver with a specific attachment…?
exactly you just need an impact driver along with an impact wrench attachment