
How to Repair Vinyl Siding: Replace a Damaged Panel Step by Step
You are walking around your house and notice a problem near the bottom of the wall: a few chewed holes, a crack, a broken corner, or a section of vinyl siding that looks loose and rough. Maybe mice, squirrels, or another critter have been working at it. Maybe the damage came from a lawn mower, a snow shovel, a ladder, a ball, wind, or a flying piece of debris.
At first, damaged vinyl siding can seem like a cosmetic issue. But it is worth fixing before it turns into a bigger headache. Vinyl siding is part of the exterior system that helps shed rain, protect the wall from wind-driven debris, and cover the layers behind it. A hole or broken section can give pests easier access, allow water to reach the weather-resistive barrier, and make an otherwise well-kept house look neglected.
The good news is that you do not necessarily need to replace an entire wall of siding because of one damaged area. In many cases, you can replace a single vinyl siding panel. The repair is more involved than simply cutting out a square and gluing a patch over the hole, but the system is designed to come apart and go back together when you use the right tool and follow the correct order.
This guide explains how to repair vinyl siding by replacing a damaged panel. It focuses on standard horizontal vinyl siding, which is the common overlapping style found on many homes. If your siding is insulated, vertical, extra-thick, unusually shaped, installed around a window, or damaged near a corner, door, utility penetration, or roofline, the basic principles still apply, but the details may be different. When in doubt, use the installation guide for the exact siding product on your house.
Start by Checking What Caused the Damage
Before you buy a replacement panel, take a closer look at the area. If the siding has holes that appear chewed, do not assume the repair ends with new vinyl. Look for signs that an animal may still be getting behind the wall: droppings, nesting material, scratching sounds, nearby gaps around pipes or wiring, loose foundation vents, damaged trim, or openings where siding meets another material.
You do not want to trap an animal inside the wall by sealing its only exit. If there is any chance wildlife is active in the cavity, deal with that first. A wildlife-control professional may be the right call when you hear ongoing activity, see multiple entry points, or suspect an animal has made a nest behind the siding.
Also inspect the landscaping around the bottom of the wall. Mulch, soil, firewood, stacked materials, or overgrown plants pressed against siding can create hiding places for pests and make future damage harder to notice. Keep the lower edge of the wall visible and accessible so you can inspect it regularly.
Next, check whether the siding damage is isolated. If you see one broken panel and everything around it lies flat, the repair may be straightforward. But if several panels are buckled, loose, cracked, faded, or pulling apart, the problem may be related to installation, heat movement, age, storm damage, or wall movement. Replacing one panel will not solve a broader issue.
Can You Replace Just One Piece of Vinyl Siding?
Yes. Vinyl siding is installed as a series of overlapping panels. The bottom edge of each panel locks into the panel below it, while the top edge is nailed through a row of slots called the nailing hem. The panel above then locks over the top edge of the next panel.
That interlocking design is why you cannot simply pry out a damaged panel from the middle of the wall like a loose board. You first need to unlock the panel above it. Once that upper panel is released, you can access the nails holding the damaged panel in place. After removing the old panel, you install the replacement, fasten it correctly, and re-lock the upper course.
This is also why a small vinyl siding zip tool is worth buying. It is inexpensive, simple, and specifically designed to release and reconnect the bottom locking edge of siding panels. Trying to do the job with a screwdriver, knife, or pry bar alone often leads to creases, cracks, or broken locks.
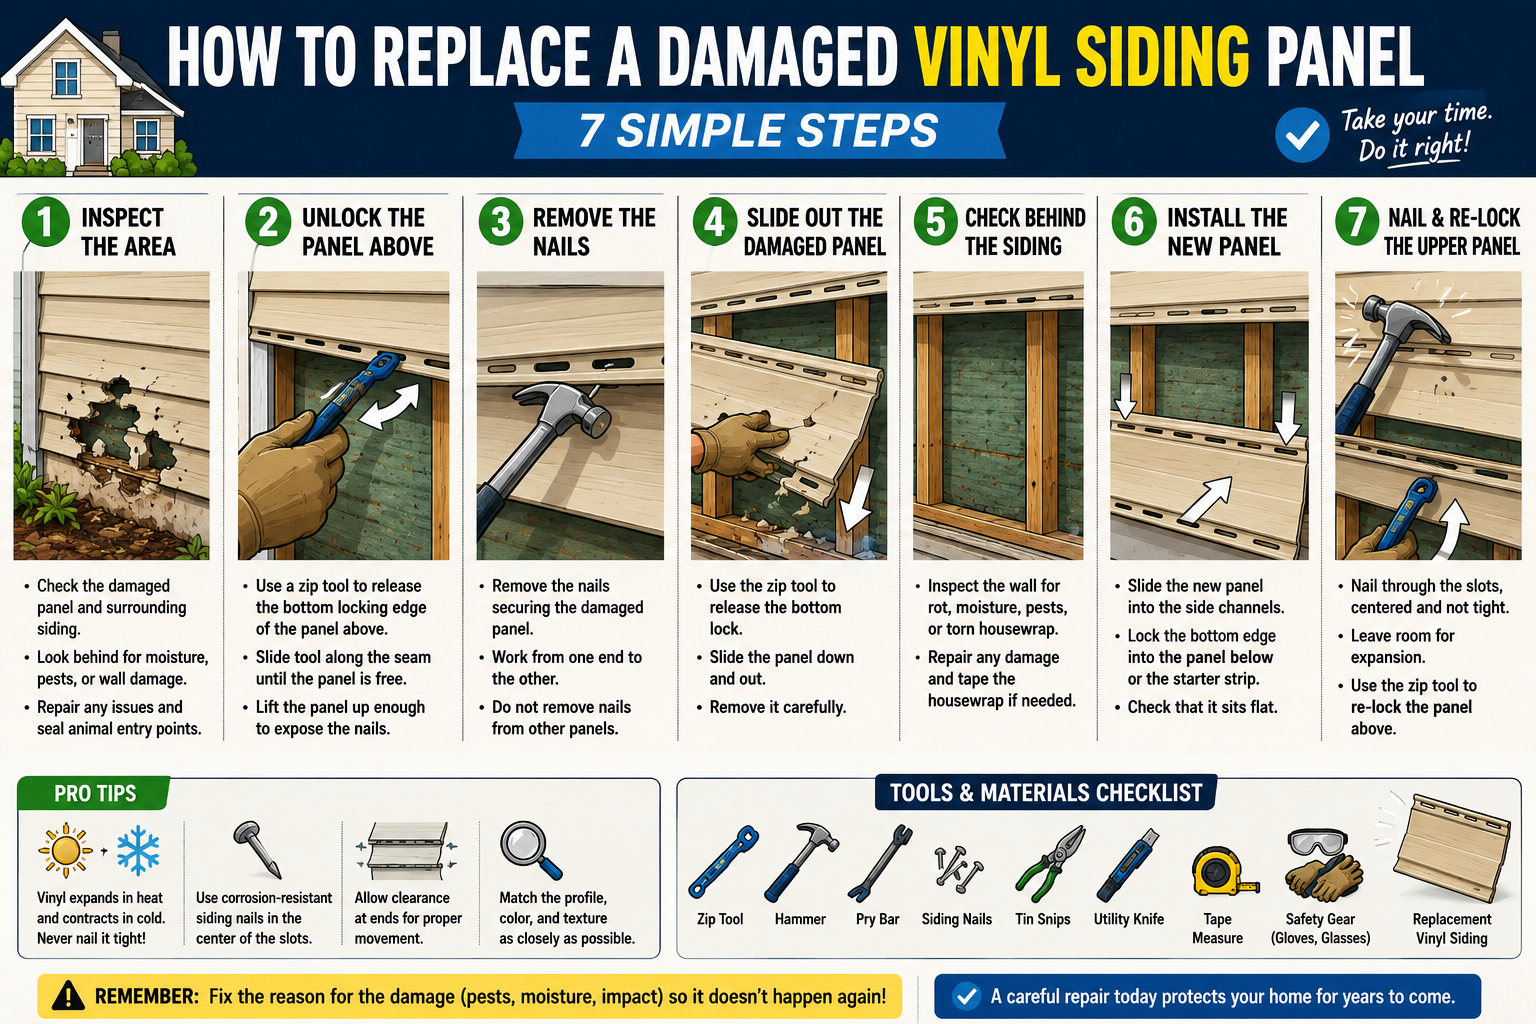
Tools and Materials You Will Need
For a standard single-panel replacement, gather the following before you start:
- Matching replacement vinyl siding panel
- Vinyl siding zip tool or unlocking tool
- Hammer
- Flat pry bar or small nail bar
- Corrosion-resistant siding nails approved for your siding system
- Utility knife
- Tin snips or aviation snips
- Tape measure
- Speed square or straightedge
- Pencil or marker
- Work gloves
- Safety glasses
- Ladder, if required
- Exterior-grade repair tape compatible with the weather-resistive barrier, if the layer behind the siding is damaged
The replacement panel matters more than many people realize. Vinyl siding comes in different profiles, thicknesses, widths, textures, colours, and exposure sizes. A panel that looks “close enough” from the store may not lock into your existing siding properly or may stand out badly once it is installed.
The best-case situation is finding leftover siding from the original installation. Check the garage, basement, shed, attic, or behind stored renovation supplies. If no spare material exists, look on the back of a loose panel for a manufacturer name, product code, or profile marking. Take a clear photo and, if possible, a small broken piece to a siding supplier.
Keep in mind that even an exact new replacement may look slightly different because existing vinyl siding fades over time. This is especially noticeable on sunny walls. A close match is still usually better than a visible broken panel, but it is smart to set expectations before starting.
Safety Before You Touch the Siding
Vinyl siding work is usually safer than roof work, but it still involves ladders, sharp edges, tools, and exterior wall details. Work during dry daylight conditions, keep your ladder on firm level ground, and do not overreach. Move the ladder instead of leaning far to one side.
Wear gloves when handling cut vinyl and tin snips. Freshly cut edges can be sharp. Eye protection is also a good idea when prying nails or cutting material.
Avoid forcing vinyl in very cold weather. Vinyl siding becomes less flexible in low temperatures, which makes it easier to crack while being bent or unlocked. If the panel feels brittle or the weather is extremely cold, wait for milder conditions or have a siding professional handle the repair.
Finally, do not blindly cut into a wall. Be aware of electrical wiring, plumbing, exterior outlets, cable lines, hose bibs, and other penetrations that may be near the damaged section.
How to Replace a Damaged Vinyl Siding Panel
1. Inspect the Damaged Panel and the Area Around It
Start by studying the damaged panel from end to end. Identify the panel directly above it, the one directly below it, and any nearby J-channel, corner trim, window trim, or utility penetrations.
If the damaged area is near the bottom of the house, determine whether the panel locks into another siding panel below or into a starter strip. The first course of siding uses a starter strip instead of a lower siding panel, so it may take a little more care to release and reinstall.
Take a few photos before you begin. They can help you remember the panel layout, seam direction, and trim details if you need to step away from the repair.
2. Unlock the Panel Above the Damaged One
This is where the zip tool comes in. Slide the hooked end of the tool behind the bottom edge of the panel directly above the damaged one. The goal is to catch the lower locking lip and gently pull it down and outward until it releases from the damaged panel below.
Once the tool catches, slide it sideways along the seam to unzip the panel across the section you need to access. Do not rush or yank hard. Vinyl siding should release with controlled pressure. If it is fighting you, check that the tool is actually hooked onto the locking edge rather than pressing into the face of the siding.
After the upper panel is unlocked, gently lift it enough to reveal the nailing hem of the damaged panel. You are not trying to bend the upper panel back as far as possible. You only need enough room to access the nails.
3. Remove the Nails Holding the Damaged Panel
Look along the upper nailing hem of the damaged panel. You should see nails driven through the elongated slots. Use a flat bar or nail bar carefully to lift the nails free without damaging the panel above or the wall behind the siding.
Work from one end to the other. If a nail is stubborn, do not pry aggressively against the face of the vinyl. Apply pressure slowly and protect the siding with a thin scrap of wood or a wide putty knife if needed.
The important thing is to remove the nails from the damaged panel only. Leave surrounding panels alone unless you need to release them to gain safe access. If you start removing nails from multiple courses without a reason, the repair can quickly become larger than planned.
4. Release the Damaged Panel From the Course Below
Once the nails are removed, the damaged panel is no longer fastened at the top, but it is still locked into the panel or starter strip below. Use the zip tool again at the lower edge of the damaged panel to release that connection.
Work along the seam until the panel is free. Then pull the damaged piece down and out carefully. Do not rip it away from the wall. You want to preserve the surrounding siding, trim, and the weather-resistive layer behind it.
If the damaged panel runs into J-channel or corner trim at each end, slide it out from the channel rather than trying to bend the trim away. Watch how much clearance the old panel had at each end. Vinyl needs room to move as temperatures change, and that expansion gap matters when you install the replacement.
5. Inspect What Is Behind the Siding
This is the step that makes the repair more than cosmetic. With the panel removed, inspect the area behind it. Look at the weather-resistive barrier, often called housewrap or building paper, and check for tears, holes, staining, wet material, mold, soft sheathing, insect nests, or rodent damage.
If the wall behind the siding is dry, solid, and intact, you can continue. If the weather-resistive barrier has a small tear, repair it with a tape or patch material approved for that type of barrier. The goal is to restore a shingle-style water-shedding layer, not create a random blob of caulk.
If you find soft plywood, rotten sheathing, damp insulation, signs of a long-term leak, or an active pest problem, stop and deal with that issue first. A new siding panel will hide the damage, but it will not fix the wall.
This is also the right time to deal with the likely animal entry point. Check nearby trim, vents, utility penetrations, and gaps at the foundation or soffit. Fixing the panel without dealing with the access route can turn the repair into a repeat job next month.
6. Measure and Prepare the Replacement Panel
Lay the old panel beside the replacement and compare them carefully. Confirm that the locking edge, nailing hem, profile, and texture line up. If the replacement needs to be trimmed to length, use the old panel as a guide.
Measure twice before cutting. The replacement must fit into its trim channels while still leaving the expansion clearance specified by the siding manufacturer. Do not cut the new panel so tightly that it jams into the J-channel or corner trim.
For a straight cut, score the vinyl with a sharp utility knife against a straightedge, then bend the panel gently along the score line until it snaps. Tin snips are useful for smaller cuts, notches, and more detailed trimming. Cut slowly, especially near the locking edge, so you do not distort the profile.
If your damaged panel has an overlap joint, make sure the new panel’s joint direction matches the existing pattern as closely as possible. On most walls, the overlapping seams should face away from the most visible viewing direction when practical.
7. Lock the Replacement Panel Into Place
Slide the replacement panel into the trim channels at both ends, if present. Then engage its bottom lock with the panel below or starter strip. Work along the length of the panel and press gently until you feel or hear it lock into place.
Do not force the panel upward or downward under tension. It should sit naturally in the correct position. If it will not lock, stop and check your profile match, cut length, alignment, and the condition of the lower locking edge.
Once the bottom edge is properly engaged, make sure the panel can still move slightly side to side. That movement is normal and necessary. Vinyl expands in heat and contracts in cold. A panel installed too tightly can buckle, warp, pull loose, or make clicking noises as temperatures change.
8. Nail the Replacement Panel Correctly
This is the most important installation detail. Vinyl siding should be fastened through the nailing slots, not through the face of the panel. Place nails in the centre of the slots unless your specific manufacturer’s instructions say otherwise. Drive nails straight, not at an angle.
Do not hammer the nail heads tight against the siding. The panel needs a small gap between the nail head and the nailing hem so it can move with temperature changes. Think of the panel as hanging from the nails rather than being clamped hard to the wall.
A nail driven too tightly can stop the siding from moving. That may lead to buckling, rippling, noise, cracked panels, or open joints later. A nail at the far end of a slot can create a similar problem. Keep fasteners centred and leave the panel free to slide.
Use only fasteners appropriate for vinyl siding and the wall structure behind it. Follow the siding manufacturer’s guidance for nail type, penetration, spacing, and any special instructions for insulated siding or unusual wall assemblies.
9. Re-Lock the Panel Above
With the replacement panel installed and fastened, lower the panel above it. Use the zip tool to pull the upper panel’s bottom locking lip down and hook it over the top edge of the new panel.
Move the tool along the seam until the entire section is reconnected. Run your hand lightly across the joint to confirm it is fully locked. The repaired wall should look flat, aligned, and consistent with the surrounding siding.
Do one final check from a few steps back. Look for lifted edges, uneven seams, exposed nails, a panel trapped too tightly in trim, or a section that appears bowed. A properly installed vinyl panel should lie flat but still have room to expand and contract.
Can You Patch a Small Hole Instead of Replacing the Whole Panel?
A small patch can be an option in limited situations, especially when the damage is tiny, hidden, low on the wall, and you cannot source a matching full panel. But patching vinyl siding is not always the best-looking or longest-lasting repair.
A patch creates more seams, relies more heavily on adhesive or sealant, and can be easier to notice once the wall is viewed in direct sunlight. It can also make future repairs more complicated. For a homeowner-friendly article and a clean, repeatable repair method, replacing the entire damaged panel is the better primary approach.
Use a patch only when you fully understand the siding profile, can create a secure overlap, and can maintain proper drainage. Do not simply glue a flat piece of vinyl over a hole and call it finished.
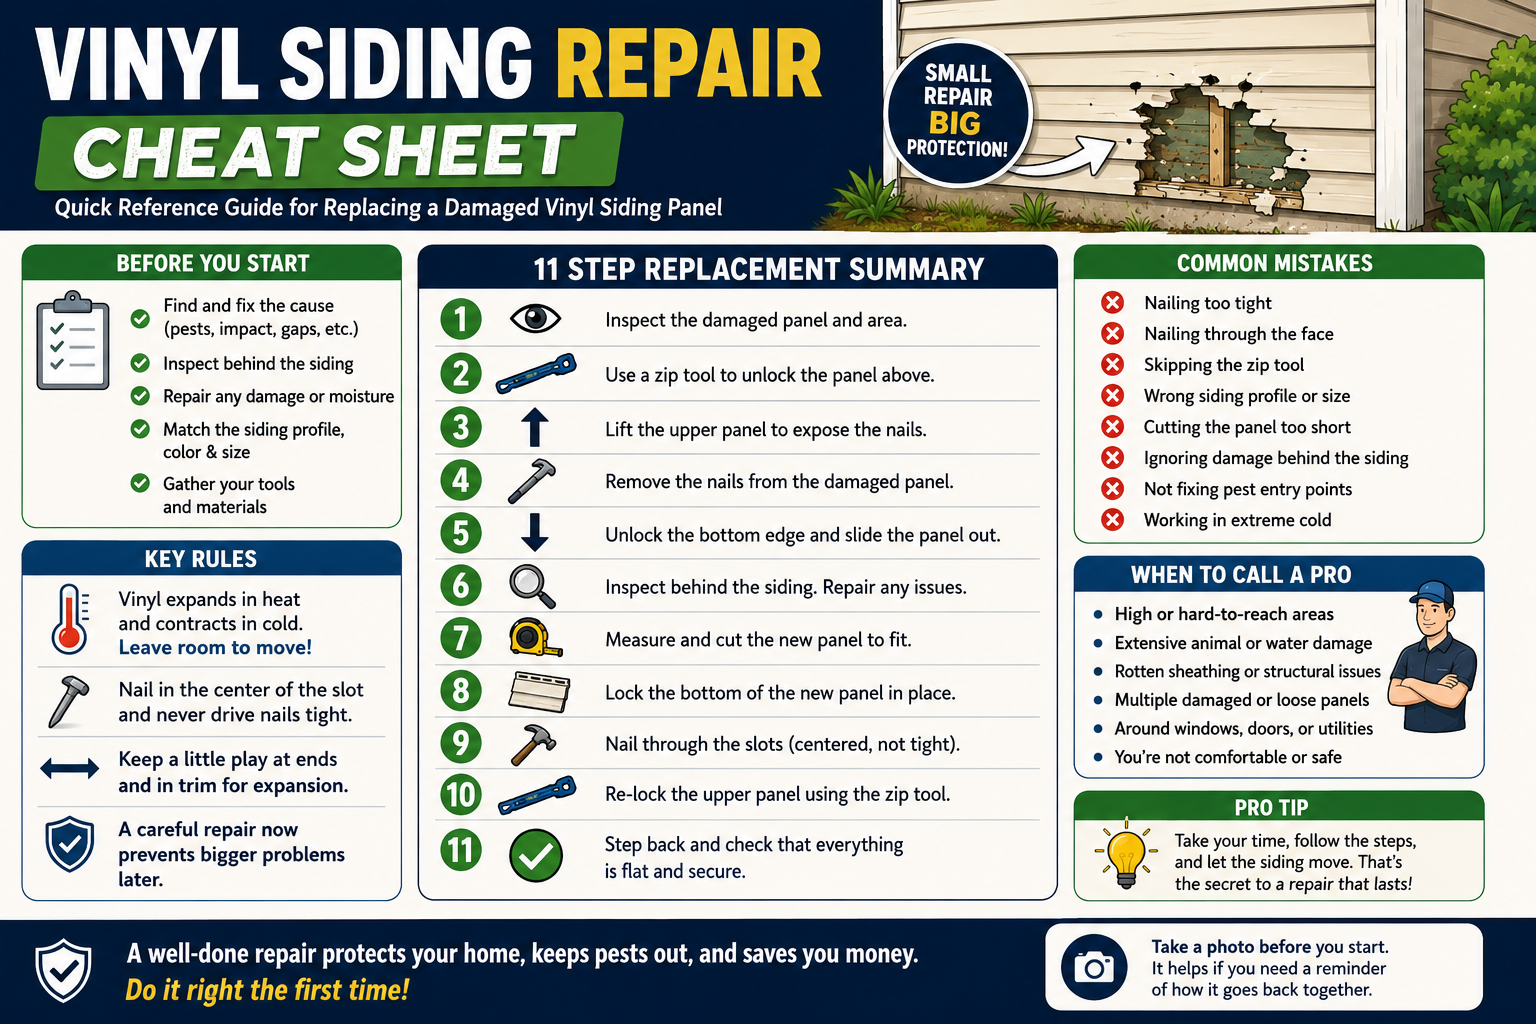
Common Vinyl Siding Repair Mistakes to Avoid
Avoid these mistakes during the repair:
- Nailing through the visible face of the vinyl panel
- Driving nails tight against the siding
- Putting nails at the end of the nailing slots
- Forgetting to unlock the upper panel before removing the damaged panel
- Trying to force a panel out without a zip tool
- Installing a replacement that is too short or too tight in the trim channels
- Ignoring torn housewrap, damp sheathing, or pest activity behind the siding
- Using a replacement with the wrong profile or texture
- Repairing the hole without fixing the animal entry point
- Working in very cold conditions when the vinyl is brittle
- Smearing caulk everywhere instead of restoring the siding and weather-resistive layers correctly
When It Is Better to Call a Pro
A single damaged panel on a low wall can be a reasonable DIY repair. But hire a siding contractor or qualified exterior repair professional when the damage is high on the house, near a roofline, around a window or door, beside electrical equipment, or located where a ladder cannot be placed safely.
You should also call a pro if you find rotten sheathing, wet insulation, extensive animal damage, multiple buckled panels, missing flashing, or a repair that requires removing trim or several siding courses. The same goes for insulated vinyl siding, specialty profiles, historic homes, and walls with complicated exterior details.
There is no prize for forcing a repair that has turned into a wall-system problem. A clean repair done at the right time is smart maintenance. A rushed repair that traps moisture, damages more siding, or hides rot will cost more later.
Frequently Asked Questions
Can mice chew through vinyl siding?
Rodents can damage vinyl siding, especially around low areas, corners, gaps, and places where the siding already has a weak spot. But not every hole is caused by mice. Check for signs of wildlife, impact damage, lawn equipment, loose fasteners, or age-related cracking before deciding what caused it.
Do I need a special tool to repair vinyl siding?
A vinyl siding zip tool is strongly recommended. It is designed to unlock and reconnect the interlocking lower edge of vinyl siding panels. Without it, you are much more likely to crack, crease, or damage the surrounding siding.
Should vinyl siding be nailed tightly?
No. Vinyl siding needs room to expand and contract as temperatures change. Nails should go through the nailing slots and should not be driven tight against the panel. A panel that cannot move can buckle or crack.
Can I replace one vinyl siding panel if the colour does not match perfectly?
Yes, but expect some difference if the existing siding has faded. Try to find the exact manufacturer, profile, and colour. If the repair is highly visible, you may decide to use a less-visible matching panel from another area of the house and install the new panel in that less-visible location.
What should I do if the wall behind the siding is damaged?
Stop the siding repair and address the hidden issue first. Repairing damaged weather-resistive barrier material, wet insulation, rotten sheathing, or an active pest problem is more important than installing the new vinyl panel. New siding should cover a sound, dry wall assembly—not hide a problem.
Final Thoughts
A damaged vinyl siding panel does not have to turn into a major exterior renovation. When the problem is isolated, the wall behind it is dry and sound, and you have a properly matched replacement panel, the repair can be handled by carefully unlocking the siding, removing the damaged piece, installing the new panel with room to move, and re-locking the course above it.
The real value of the repair is not just making the wall look better. It is catching a small weakness before moisture, insects, wildlife, or hidden wall damage gets a chance to grow into something more expensive. Take your time, match the materials carefully, do not nail the vinyl tight, and fix the reason the damage happened in the first place.
Further Reading
How to Repair Vinyl Siding — Kaycan
A direct walkthrough of releasing the panel above with an unlocking/zip tool, removing the damaged panel, installing the replacement, and re-locking the upper course.
When to Call a Contractor for Siding Problems — CertainTeed
Useful for your “when to call a pro” section, especially where there is rot, mold, widespread cracking, or insulation exposure.