
How to Use Batter Boards and String to Lay Out a Shed Foundation
There is a moment at the beginning of almost every shed, garage, deck, or small building project when everything looks deceptively simple. You have an empty patch of ground, a tape measure, a few stakes, and a rough idea of where the building is supposed to go. Then you try to mark four corners accurately and suddenly discover that making a rectangle is easy, but making one that is actually square, correctly positioned, and still identifiable after you start digging is another story entirely.
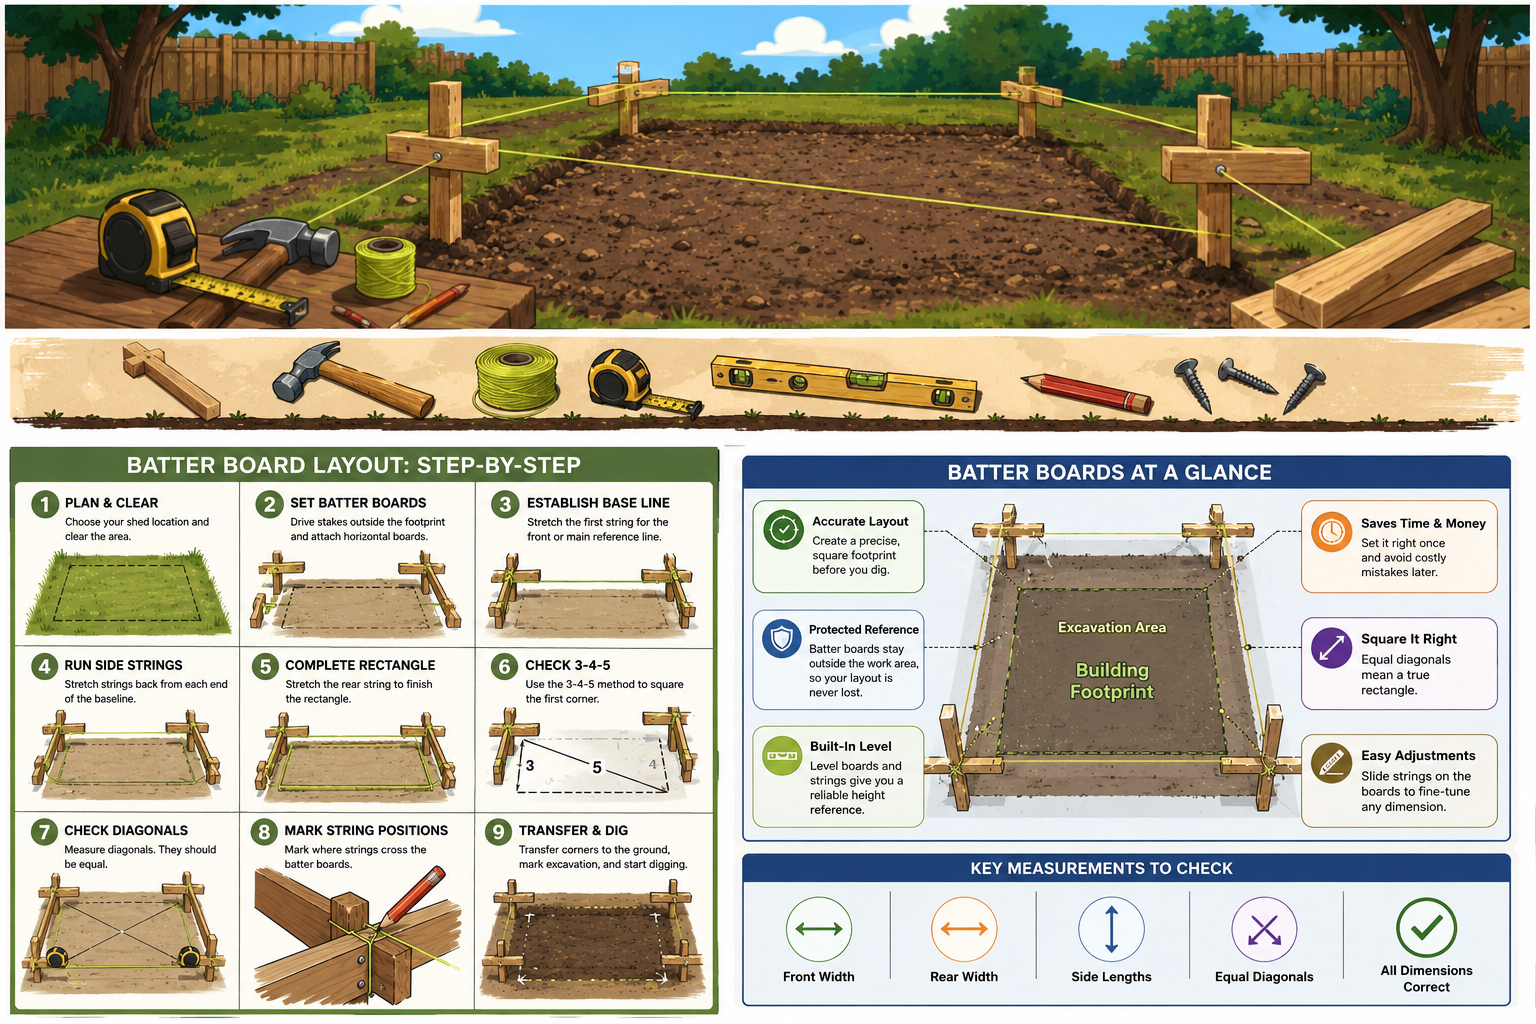
That is where batter boards come in. They look almost primitive—just stakes, scrap lumber, and string—but they solve several problems at once. Batter boards let you establish exact building lines, adjust those lines without repeatedly moving stakes, check that your footprint is square, preserve the building location after excavation begins, and even establish useful elevation references if you set them carefully.
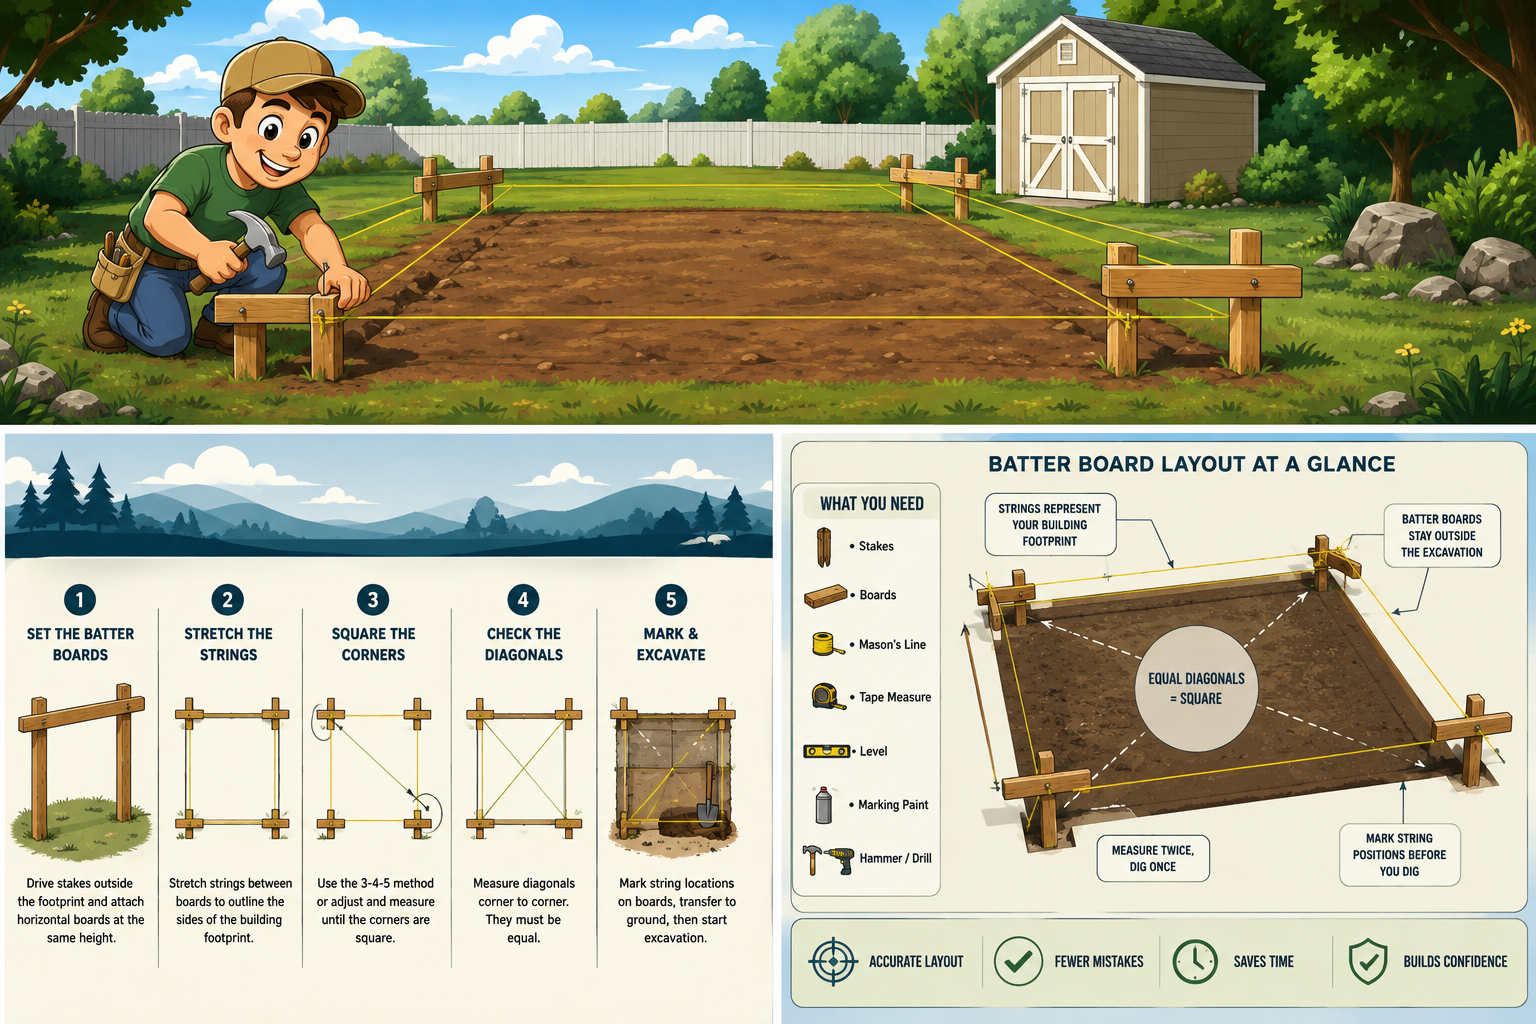
If you have never used batter boards before, the setup can look more complicated than it really is. The most important thing to understand is that the strings represent the building. The wooden batter boards are simply adjustable supports that hold those strings in exactly the right places while you work underneath and around them.
What Are Batter Boards?
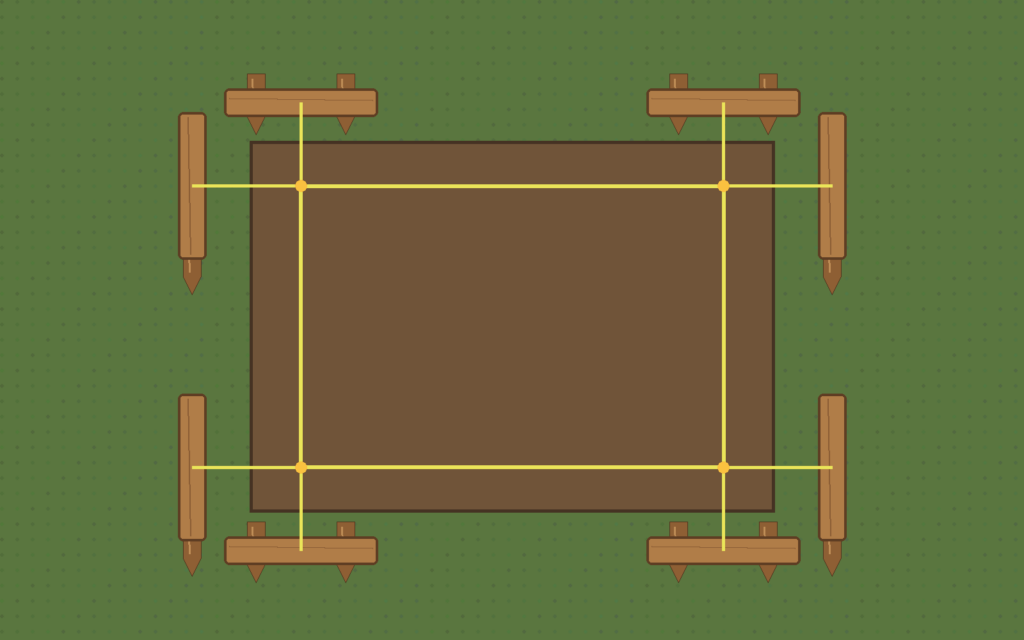
A batter board is a temporary wooden frame positioned outside the actual footprint of a structure. Usually, two stakes are driven into the ground and a horizontal piece of lumber is fastened across them. Mason’s line is then stretched between batter boards around the site to represent the exact lines of the future foundation, floor, or walls.
The important detail is that the batter boards sit outside the area you are going to excavate. If you simply drive a stake directly into each building corner, those stakes end up exactly where you need to dig. Once they are removed or knocked over, you lose your original reference point and have to start measuring again.
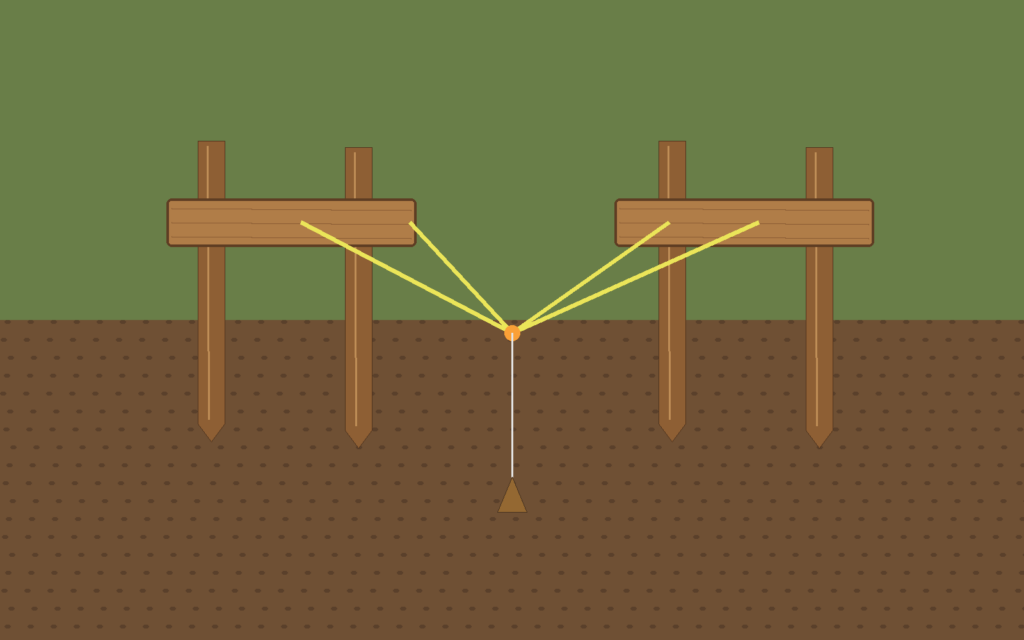
Batter boards move those reference points away from the construction area. Once the building footprint has been accurately established, you mark exactly where each string crosses the horizontal batter boards. You can then remove the strings, excavate the site, and reinstall the lines later in exactly the same positions.
That simple trick is the real genius of the system. You are essentially storing the location of your building outside the excavation.
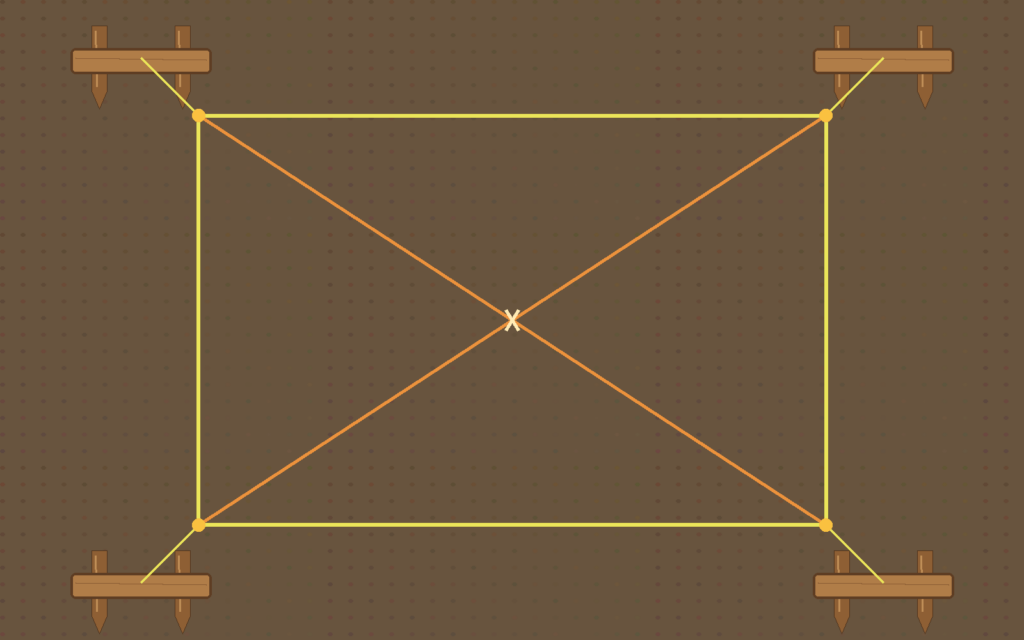
The diagrams below would help show the three ideas that are often hardest to understand the first time: where the batter boards sit, how the strings intersect to establish the corners, and how diagonal measurements prove whether the layout is square.
Why Not Just Put Four Stakes in the Ground?
For extremely small projects, you sometimes can. If you are laying out a garden bed or positioning a small platform, four stakes and some string may work perfectly well. The problems usually start once actual excavation and construction begin.
Imagine carefully locating all four corners of your shed and driving stakes into them. Then you start removing sod and digging several inches down for a gravel foundation. One stake gets knocked loose with the shovel, another ends up directly in the excavation, and somebody accidentally kicks a third one while carrying gravel.
Your carefully measured building footprint is slowly disappearing.
Batter boards solve this by keeping the important reference points safely outside the work area. The string floats above the construction site while the stakes holding it are far enough away that digging, compacting, and moving materials should not disturb them.
That is why batter boards can initially feel like unnecessary extra work but often save time later. You spend a little more time establishing the building correctly once, and considerably less time trying to rediscover where everything was supposed to go.
What You Need to Build Batter Boards
You do not need expensive surveying equipment to lay out a typical backyard shed. In fact, most of the batter-board setup can be made from scrap lumber as long as the material is reasonably straight and strong enough to remain stable.
For a small shed project, you will typically need:
- Wooden stakes
- Scrap 1x or 2x lumber for the horizontal boards
- Mason’s line or low-stretch construction string
- A long tape measure
- Exterior screws or nails
- Drill or hammer
- Level or line level
- Marking paint
- Pencil or permanent marker
- Heavy mallet or sledgehammer
- Calculator
- Optional plumb bob
The batter boards themselves do not have to look pretty. They are temporary construction tools. What matters is that they are rigid enough that tightening the string does not pull the stakes out of position.
Step 1: Decide Where the Shed Will Go
Before installing anything permanent, establish approximately where the shed should sit. This is the point where you need to think about property lines, required setbacks, drainage, access, nearby trees, the direction your door will face, and any underground utilities.
Start by roughly measuring the footprint on the ground. You can place temporary stakes near the four approximate corners just so you can visualize the structure. These first stakes are not your final measurements; they simply give you a reference for placing the batter boards.
For the FinklerDIY pallet-shed project that inspired this guide, the working footprint is approximately 10 feet 6 inches wide by 15 feet long. That is the rectangle our strings will eventually represent.
Step 2: Position the Batter Boards Outside the Excavation
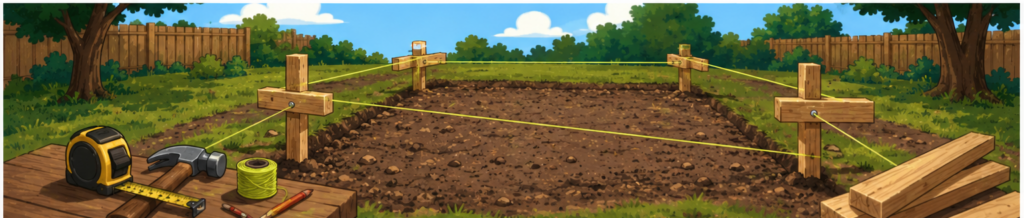
Your batter boards should be far enough away from the shed that they will not interfere with excavation, wheelbarrows, compacting equipment, gravel placement, or floor construction. For a small shed, leaving a few feet of working space around the footprint usually makes life much easier than crowding the boards immediately beside the structure.
Drive two stakes firmly into the ground outside each corner area and attach a horizontal board between them. You want enough horizontal board sticking out on either side that the string can be moved several inches if necessary.
That adjustability is important. At this stage, you are not trying to nail the exact string position immediately. You are creating stable supports that allow the strings to slide sideways while you fine-tune the building layout.
Keep the boards at roughly the same elevation if possible. If you level them carefully, the string lines can later help you establish not only the horizontal building position but also elevations for gravel, patio stones, floor supports, or framing.
Step 3: Establish Your First Reference Line
Choose one side of the building to use as the primary reference. Usually this will be the front wall, a side running parallel to a fence, or whichever side needs to maintain a specific setback or alignment.
Stretch mason’s line between two batter boards to represent that wall. Pull the string tight enough that it does not sag significantly.
This becomes your baseline.
Take extra time with this first line because its direction influences the entire building. You can build a perfectly square shed and still discover that it is sitting at a strange angle on the property if your first reference line was poorly chosen.
Step 4: Establish the Side Lines
Now run strings from either end of your baseline toward the rear of the proposed shed. Initially, these only need to be approximately perpendicular to the first line.
Measure the desired building length along both sides.
For our example, the front of the shed is 10 feet 6 inches wide and the sides are 15 feet long. Once those lines are roughly positioned, stretch another string across the rear to complete the rectangle.
At this point, you should have something that looks like a rectangular shed footprint floating above the ground.
Do not start digging yet.
Looking square and actually being square are very different things.
Step 5: Understand the 3-4-5 Method
One of the oldest tricks in construction is the 3-4-5 method. It comes directly from the Pythagorean theorem.
If one side of a triangle measures 3 units, the second measures 4 units, and the diagonal between them measures exactly 5 units, the angle between those first two sides is 90 degrees.
You can therefore measure 3 feet along one string and 4 feet along the adjacent string. The distance between those two marks should be 5 feet if the corner is square.
For larger buildings, increasing the triangle improves practical accuracy. Instead of 3-4-5 feet, you could use:
- 6-8-10
- 9-12-15
- 12-16-20
The larger your triangle, the less influence a small measuring error has on the final angle.
The 3-4-5 method is an excellent way to get your first corner close to square. Once the whole building footprint has been established, however, there is an even better final test.
Measure the diagonals.
Step 6: Square the Shed With Diagonal Measurements
A true rectangle has two equal diagonals.
Measure from the intersection of the strings at one corner to the opposite corner. Write down that measurement. Then measure between the other two opposite corners.
If the two diagonal measurements are different, the structure is not square.
This is where batter boards become extremely useful. Instead of pulling stakes out and starting again, you slide the strings slightly along the horizontal boards. Adjust one or more corners, check your side dimensions again, and measure the diagonals another time.
For our 10-foot-6-inch by 15-foot example, the theoretical diagonal is approximately 18 feet 3 3/4 inches.
You do not need to become obsessed with reproducing that mathematical measurement down to a tiny fraction outdoors. The more important practical goal is getting both diagonals to match while keeping your front, rear, and side measurements correct.
That often requires several rounds of adjusting and measuring.
That is normal.
Step 7: Check Every Measurement Again
Once the diagonals match, resist the temptation to immediately grab a shovel.
Measure everything one more time.
Check the front width. Check the rear width. Check both sides. Measure both diagonals again.
Adjusting one corner can slightly change another measurement, so squaring a structure is usually an iterative process rather than a single measurement.
Before digging, you want all of the following to be true:
- Front width is correct
- Rear width matches the front
- Left side length is correct
- Right side matches the left
- Both diagonals match
- The building remains correctly positioned on the property
When all of those measurements agree, you have a properly established rectangular footprint.
Spending an additional ten minutes here could save hours of frustration later in the build.
Step 8: Mark the Final String Locations
Once you are satisfied with the layout, mark exactly where each string crosses the horizontal batter board.
There are several ways to do this. You can use a pencil or permanent marker, drive a small screw or nail beside the string, or cut a very shallow notch into the board.
The important thing is repeatability.
If you remove the string tomorrow, you should be able to return and put it back in exactly the same position.
This is one of the biggest advantages of batter boards. Once those positions are established, you can temporarily remove the strings whenever they are in your way.
Your original building layout has not been lost.
It is stored on the batter boards.
Step 9: Transfer the Building Lines to the Ground
Your strings represent the exact building footprint, but they are floating above the soil.
Now you need to transfer that layout downward.
At each corner, the intersection of two strings represents the corner of the building. You can use a plumb bob or another careful vertical reference to transfer the point directly to the ground.
Use marking paint to identify the corners and excavation area.
If your gravel base is going to extend beyond the finished structure—and it often should—measure outward from the building footprint and mark a separate excavation boundary.
This distinction is important.
The string lines represent the finished building.
The excavation line represents the area being prepared underneath and around it.
They do not necessarily have to be identical.
How Deep Should You Dig for a Small Shed Base?
There is no universal excavation depth that works for every site because soil conditions, drainage, climate, foundation design, and local construction requirements vary considerably.
For a small floating shed supported on a compacted gravel base rather than traditional frost-depth footings, a common DIY approach is to remove the sod and organic topsoil until firm undisturbed soil is reached. That might mean roughly four to six inches on some sites, but poor soil may require additional excavation.
The important principle is not simply reaching an arbitrary depth.
You want to remove soft organic material, establish a reasonably level subgrade, provide drainage, and replace the removed material with properly compacted crushed stone.
For our pallet-shed project, the working plan is approximately four inches of compacted granular material beneath the support system, provided the soil underneath proves firm enough.
If you discover soft clay, buried organic material, standing water, or unstable soil, stop and reassess rather than blindly following a predetermined depth.
The ground has the final say.
Should Batter Boards Be Level?
Strictly speaking, batter boards do not need to be perfectly level if you only care about the footprint when viewed from above.
However, leveling them makes the setup far more useful.
If the horizontal boards and strings share a known elevation, you can measure downward from the strings to compare the height of your gravel base, patio stones, sleepers, floor framing, or other foundation components.
That means the batter-board setup becomes more than just a way to keep the building square.
It becomes a basic construction reference system.
Instead of guessing whether one side of the foundation is higher than the other, you have a consistent reference plane surrounding the project.
For a beginner, that can make the next stages significantly easier.
Common Batter-Board Mistakes
Batter boards themselves are simple. Most problems happen because someone rushes the measurements or assumes something is accurate simply because it looks right.
Some of the most common mistakes include:
- Stakes that move when the string is tightened
- Strings that sag excessively
- Batter boards positioned too close to the excavation
- Measuring from inconsistent sides of the string
- Forgetting to recheck wall lengths after adjusting the diagonals
- Measuring diagonals from the wooden boards rather than the string intersections
- Forgetting to mark the final string positions
- Assuming a nearby fence or driveway is perfectly straight
- Starting excavation before identifying underground utilities
Another common problem is overconfidence after getting one corner square.
A 90-degree corner does not automatically mean the whole rectangle is correct. The opposite sides still need to match, and the two full diagonals should agree.
Measure the entire system.
Do You Really Need Batter Boards for a Shed?
This is a fair question.
For a tiny prefabricated garden shed that simply sits on a few blocks, constructing batter boards might be unnecessary. Four stakes, a tape measure, and careful diagonal measurements could be enough.
Modern laser levels and surveying equipment can also establish layouts very quickly when used properly.
But that does not make batter boards obsolete.
They are cheap, require no batteries, can be built from scrap material, preserve your reference points during excavation, and allow repeated adjustments without constantly moving stakes.
For a roughly 10-by-15-foot shed where you plan to excavate soil, install compacted gravel, position numerous supports, and build a floor system above them, I think batter boards are worth the effort.
The additional setup costs almost nothing.
Getting a crooked floor wrong can cost considerably more.
Why Being Square Matters More Than You Think
A foundation that is out of square does not remain a foundation problem.
The error travels upward.
When your floor is crooked, wall framing becomes more difficult. Sheet goods stop lining up where expected. Corners require strange adjustments. Door openings can rack. Roof framing becomes harder to align.
Eventually, you find yourself compensating for a mistake that occurred before the first permanent piece of lumber was installed.
This is why experienced builders can seem almost obsessive about layout.
Accuracy is cheapest at the beginning.
Moving a string half an inch takes seconds.
Correcting a framed wall that is half an inch out of position takes considerably longer.
The FinklerDIY Pallet-Shed Example
The project that inspired this guide is a DIY pallet shed with a working footprint of approximately 10 feet 6 inches wide by 15 feet deep.
Before the pallet floor, rigid insulation, OSB, walls, or roof go anywhere near the site, the first job is establishing that rectangle accurately.
The batter boards will sit beyond the future gravel foundation. Strings will establish the four finished outside building lines. The side dimensions will be checked, the roughly 18-foot-3-3/4-inch diagonals will be compared, and the final string positions will be permanently marked on the boards.
Only then does excavation begin.
Once the soil is removed, those same strings can be reinstalled and used to position the compacted gravel foundation, support stones, floor framing, and other components.
Instead of measuring every stage independently, the entire project continues referencing the same original geometry.
That is what makes batter boards so useful.
They turn an empty patch of ground into a construction coordinate system.
Final Verdict: An Old-School Technique That Still Makes Sense
Batter boards are not sophisticated.
There is no screen, battery, laser, app, or complicated calibration procedure. You drive stakes into the ground, attach boards, stretch strings, measure repeatedly, and move those strings until the geometry works.
Yet that simplicity is exactly why they remain useful.
Could you build a small shed without batter boards? Absolutely.
But if you are excavating a foundation area, preparing a gravel base, positioning numerous supports, or simply trying to learn proper construction layout, batter boards are one of those traditional techniques that earn their keep surprisingly quickly.
More importantly, they force you to do something DIY builders are often tempted to skip.
They force you to stop and prove that the building is correctly positioned, correctly sized, and actually square before doing anything difficult to reverse.
Once the shovel goes into the ground, those extra measurements suddenly stop feeling like wasted time.
They start looking like very cheap insurance.
Helpful External Resources
Lowe’s has a useful visual guide explaining the basic process of making and using batter boards:
QUIKRETE also publishes a helpful guide covering layout basics for slabs and footings, including batter-board setups:
Batter boards are def overkill for a simple shed but if you’re trying to learn proper construction techniques it is an ideal way to practice.